In imToken version 2.16.0, the imKey hardware wallet officially supports Taproot and Native SegWit Bitcoin accounts. Before making transfers with these accounts, please ensure that the imKey firmware is upgraded to version 1.9.05. For detailed information on the firmware upgrade process, please refer to imKey Manager User Guide: How to Perform COS Upgrade.
Note: When creating or importing a Bitcoin wallet, the default address type is Taproot, with the derivation path m/86'/0'/0' (starting with "bc1p"). After adding an account, you can choose other address types based on your needs (Legacy, Nested SegWit, or Native SegWit).
How to Reconfigure the Device After the Firmware Upgrade?
Open your phone settings, go to the "Bluetooth" option, find the corresponding imKey device name, and tap "Forget this Device."
Open the imToken app and re-pair the imKey device. If you are prompted with "Device pairing information has changed, please unpair first, and then re-pair it.
How to Add Different Types of Bitcoin Addresses?
Before starting this process, ensure that your phone's Bluetooth is successfully connected to the imKey hardware wallet.
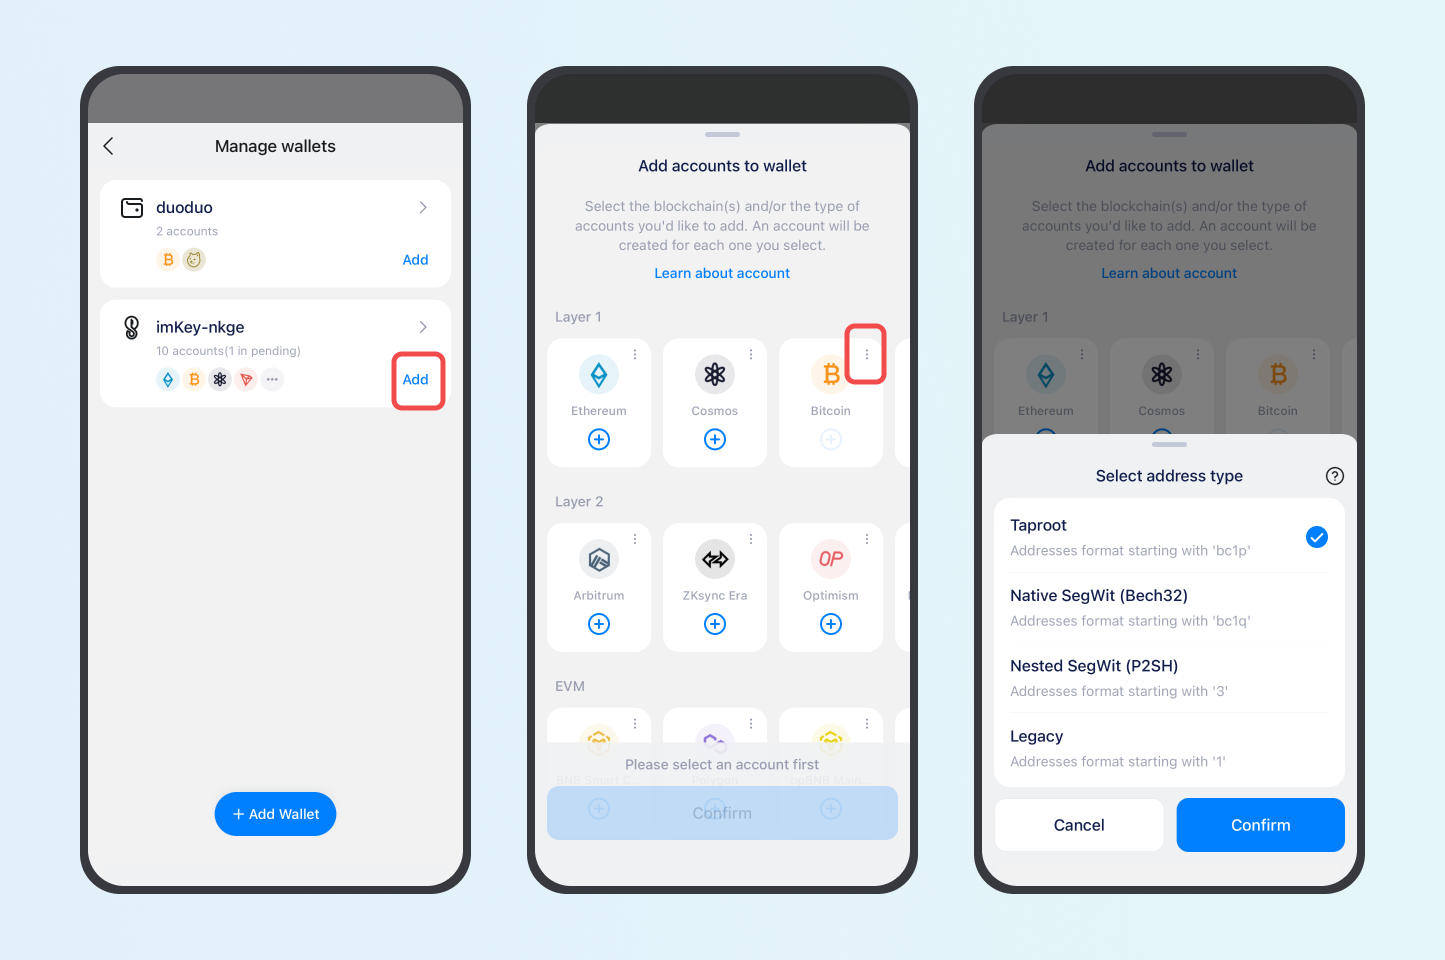
Open imToken, go to "My Profile" - " Manage wallets," select the paired imKey hardware wallet, and tap "Add ."
On the "Add Account" page, find the "Bitcoin" network icon under the Layer 1 section. Click the "+" button and you will find four address types: Taproot, Native SegWit (Bech32), Nested SegWit (P2SH), and Legacy.
Select the address type you want to add and tap "Confirm." Then, return to the wallet homepage, and you will see the newly added BTC address account.
Notes:
Transaction fees for Native SegWit, Nested SegWit, and Taproot Bitcoin addresses are lower than those for Legacy addresses.
Currently, only one account can be created for each Bitcoin address type under the same wallet generated from a single set of mnemonic phrases.
Bitcoin tokens are not interoperable between different address types. If you need to transfer assets between different address types, simply do so through a standard transaction.
Important Notice:imKey sells physical security hardware products only and does not provide any virtual asset trading, custody, or funds-related services. References to third-party wallets, exchanges, or decentralized applications are for compatibility purposes only; related functions and services are provided independently by third parties.
imKey supports 12 major public blockchains including Ethereum, Bitcoin, Cosmos,Vaulta,TRON, Nervos, Bitcoin Cash, Litecoin, Kusama, Polkadot,Dogecoin,and Filecoin. It also supports Layer2 networks such as Arbitrum, Optimism, zkSync Era, as well as EVM-compatible networks like BSC, Avalanche, and Polygon.
The supported tokens for each blockchain in imKey can be viewed in the table below.
Public Chain
Supported Token
Ethereum
ETH, ERC20, ERC721, ERC1155 Tokens
Bitcoin
BTC and Omni USDT
Cosmos
ATOM
TRON
TRX, TRC10, and TRC20 Tokens
Nervos
CKB
Bitcoin Cash
BCH
Litecoin
LTC
Kusama
KSM
Polkadot
DOT
Filecoin
FIL
Vaulta
A and tokens on the Vaulta chain
Dogecoin
DOGE
The supported tokens for each layer 2 network within imKey can be found in the table below.
Important Notice:imKey sells physical security hardware products only and does not provide any virtual asset trading, custody, or funds-related services. References to third-party wallets, exchanges, or decentralized applications are for compatibility purposes only; related functions and services are provided independently by third parties.
Bitcoin wallet is built as a Hierarchical Deterministic (HD) framework, which is a method for generating and managing different addresses. Each public address of your wallet will be generated from your wallet's Extended Public Key (xPub).
If you use the same address to receive Bitcoin, everyone can track all your transaction records easily. By creating a new address, a child address, you are better able to maintain your privacy.
How to create child address
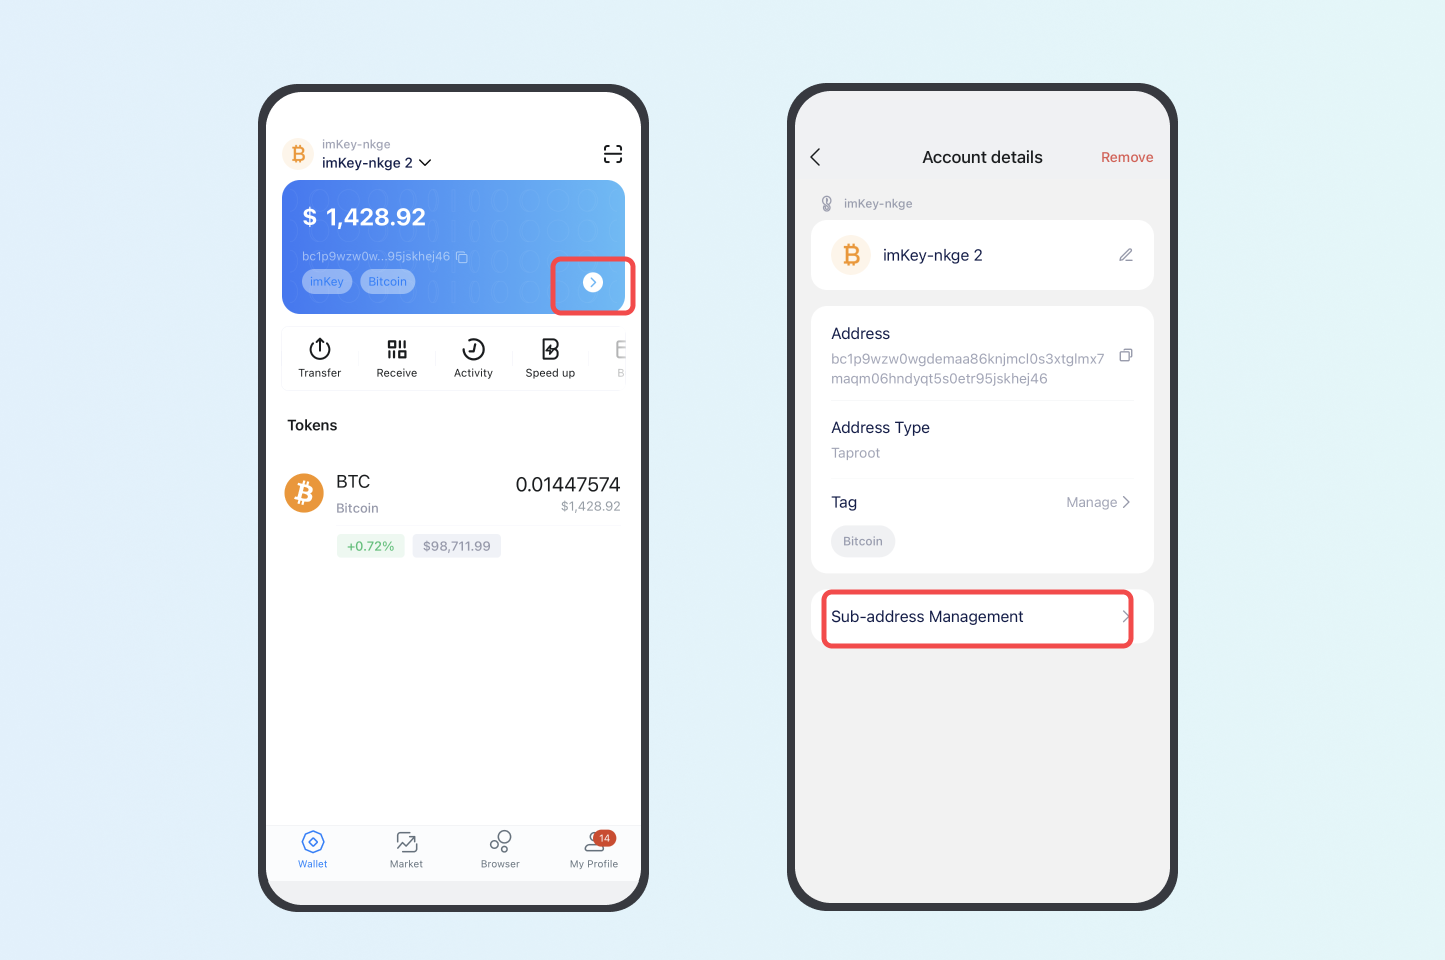
1. Open the BTC account and click ">" in the top right corner of the account page, and click “Sub-address Management"
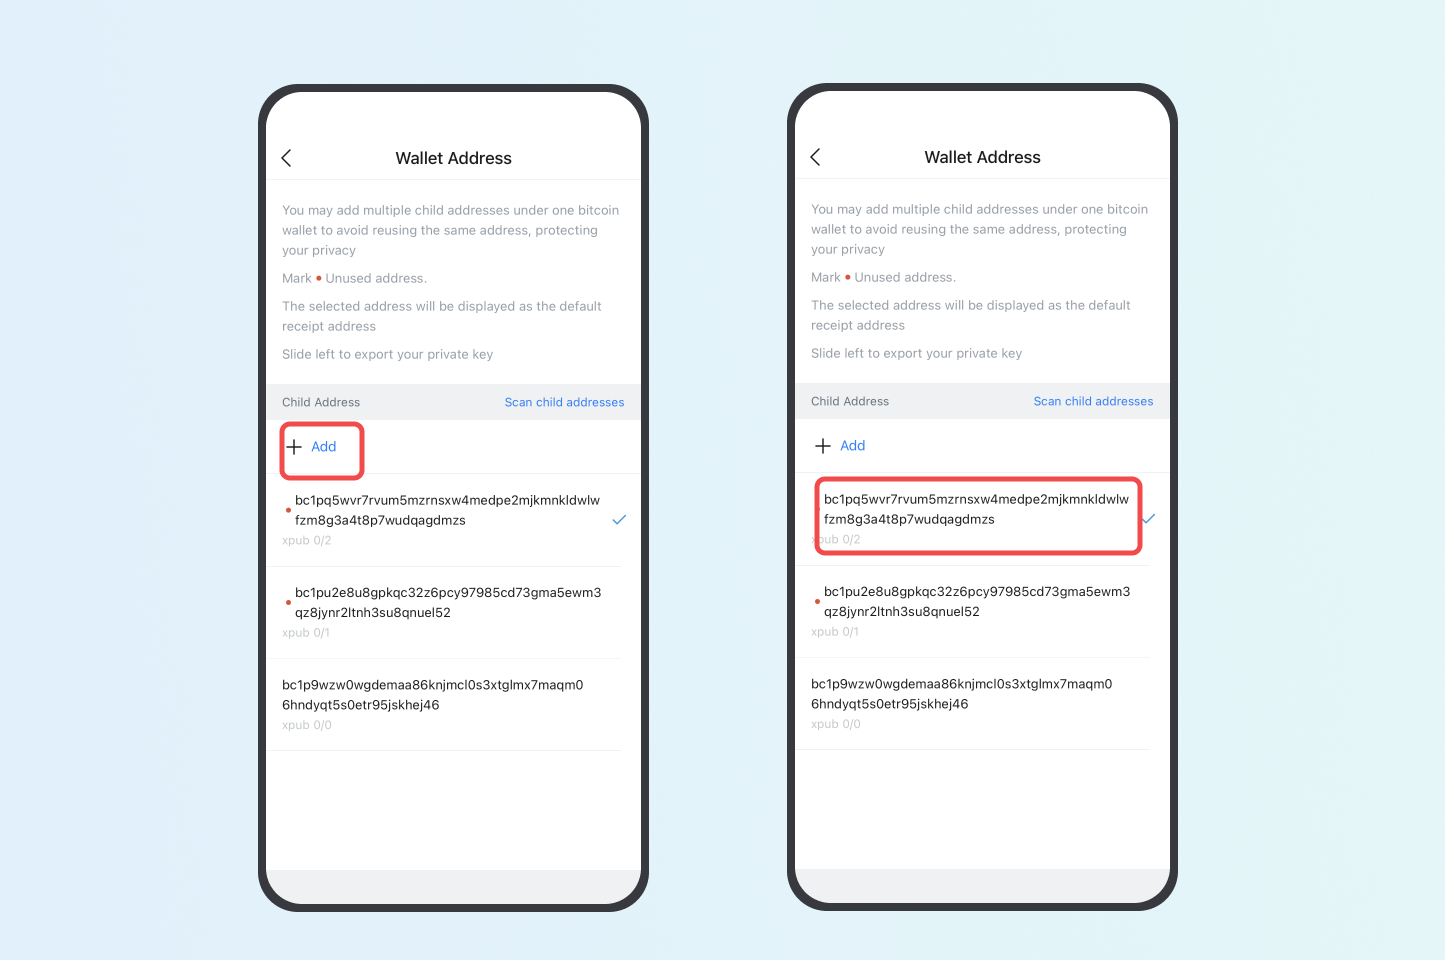
2. Click "+ Add" to add a new child address and check the newly created address.
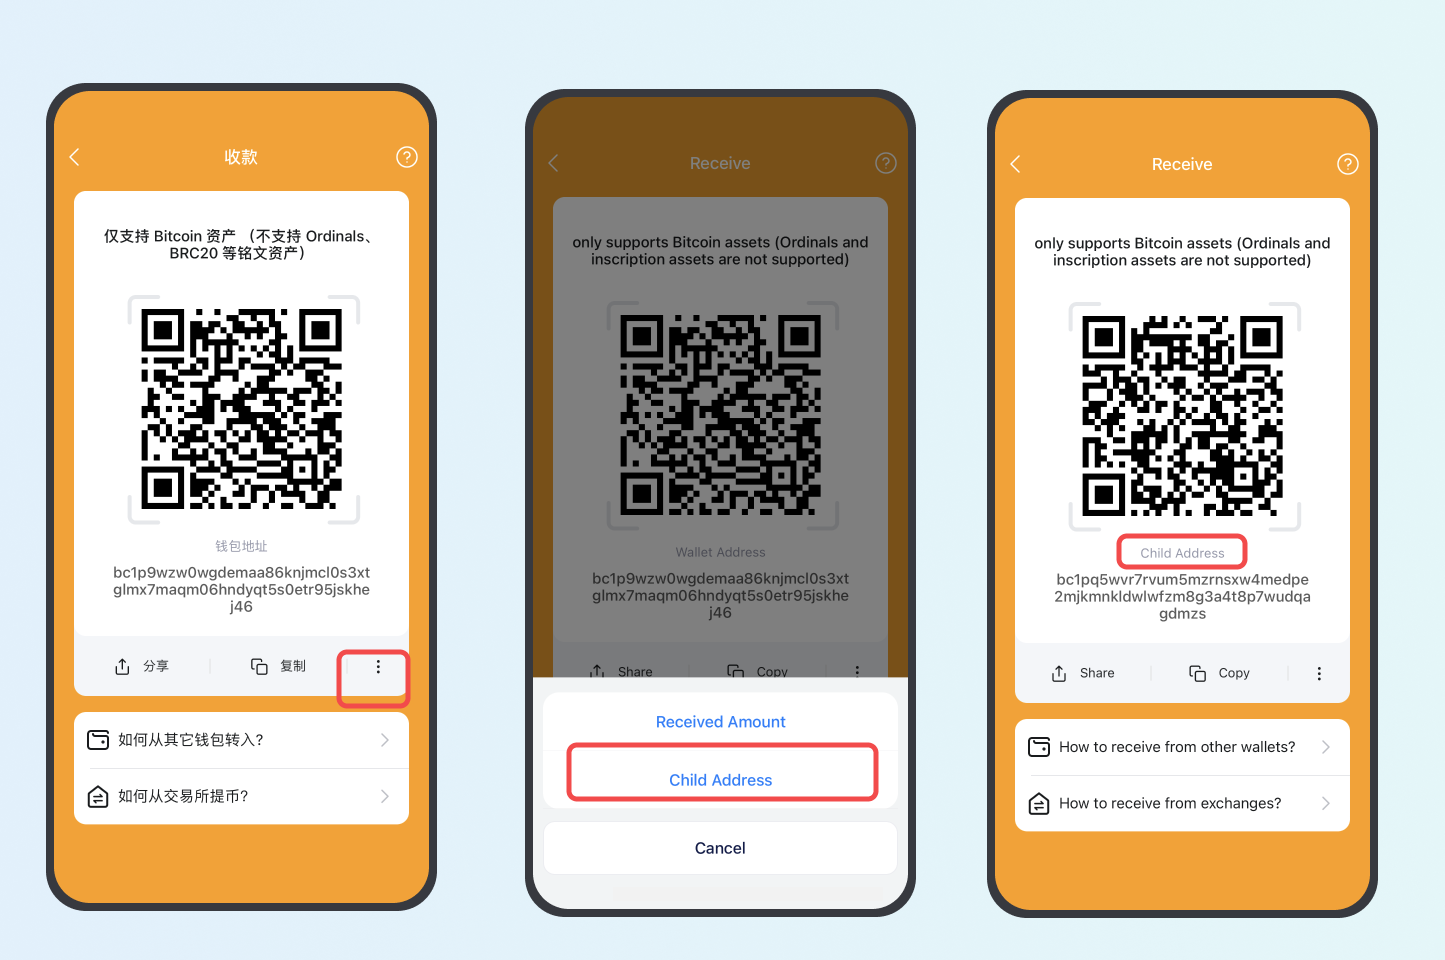
3. Open the Receive page and click "... “ - "Child Address" to switch to the newly created child address.
Attentions
The tokens displayed by the main address of the BTC wallet = the actual tokens of the main address + the child address tokens + the change address tokens
Each address has a unique plaintext private key, but you don’t need to backup the private key of each address separately. As long as you have backed up a set of mnemonics corresponding to the BTC wallet, which means you have backuped the private key of each child address.
Important Notice:imKey sells physical security hardware products only and does not provide any virtual asset trading, custody, or funds-related services. References to third-party wallets, exchanges, or decentralized applications are for compatibility purposes only; related functions and services are provided independently by third parties.
As the Bitcoin protocol has evolved, various address types have been introduced within the network to meet demands for security and efficiency. Below are four address formats in Bitcoin:
Legacy Address (P2PKH)
Legacy addresses, which were the original format used in Bitcoin, begin with the digit 1, such as 1MbeQFmHo9b69kCfFa6yBr7BQX4NzJFQq9.
These addresses utilize the Pay-to-Public-Key-Hash (P2PKH) script, occupy more space on the blockchain, process transactions relatively slower, and offer lower anonymity.
Nested SegWit Address (P2SH)
Nested SegWit addresses start with the digit 3 in Bitcoin, for example: 3EmUH8Uh9EXE7axgyAeBsCc2vdUdKkDqWK.
SegWit (Segregated Witness) is a technology upgrade aimed at solving Bitcoin's scalability problem, increasing network capacity, and reducing transaction fees. SegWit addresses reduce the size of BTC transactions, thereby lowering transfer costs.
Native SegWit Address (P2WPKH)
Native SegWit addresses start with bc1q and use the Bech32 encoding scheme, for example: bc1qj89046x7zv6pm4n00qgqp505nvljnfp6xfznyw.
Compared to Nested SegWit, Native SegWit addresses further optimize transaction processing and perform better in terms of wallet compatibility, readability, and space savings.
Taproot Address (P2TR)
Taproot addresses start with bc1p and are the latest and most advanced format for bitcoin. They use the Bech32m encoding scheme, for example: bc1p8denc9m4sqe9hluasrvxkkdqgkydrk5ctxre5nkk4qwdvefn0sdsc6eqxe.
Taproot, activated on Bitcoin in late 2021, introduces a new signature scheme called Schnorr, which allows complex multi-signature transactions to appear like ordinary transactions, thus enhancing privacy.
Reminder:
All four address types can be derived from the same mnemonic phrase. When generating a BTC account via imToken, you can choose any of these four address formats (Taproot address is the default if not chosen).
In the wallet generated from the same mnemonic phrase, each BTC address type currently supports creating only one account.
BTC is not directly interchangeable among these address types. To transfer BTC from one type of address to another, you need to perform a transfer operation.
Important Notice:imKey sells physical security hardware products only and does not provide any virtual asset trading, custody, or funds-related services. References to third-party wallets, exchanges, or decentralized applications are for compatibility purposes only; related functions and services are provided independently by third parties.
In imToken version 2.16.0, the imKey hardware wallet officially supports Taproot and Native SegWit Bitcoin accounts. Before making transfers with these accounts, please ensure that the imKey firmware is upgraded to version 1.9.05. For detailed information on the firmware upgrade process, please refer to imKey Manager User Guide: How to Perform COS Upgrade.
Note: When creating or importing a Bitcoin wallet, the default address type is Taproot, with the derivation path m/86'/0'/0' (starting with "bc1p"). After adding an account, you can choose other address types based on your needs (Legacy, Nested SegWit, or Native SegWit).
How to Reconfigure the Device After the Firmware Upgrade?
Open your phone settings, go to the "Bluetooth" option, find the corresponding imKey device name, and tap "Forget this Device."
Open the imToken app and re-pair the imKey device. If you are prompted with "Device pairing information has changed, please unpair first, and then re-pair it.
How to Add Different Types of Bitcoin Addresses?
Before starting this process, ensure that your phone's Bluetooth is successfully connected to the imKey hardware wallet.
Open imToken, go to "My Profile" - " Manage wallets," select the paired imKey hardware wallet, and tap "Add ."
On the "Add Account" page, find the "Bitcoin" network icon under the Layer 1 section. Click the "+" button and you will find four address types: Taproot, Native SegWit (Bech32), Nested SegWit (P2SH), and Legacy.
Select the address type you want to add and tap "Confirm." Then, return to the wallet homepage, and you will see the newly added BTC address account.
Notes:
Transaction fees for Native SegWit, Nested SegWit, and Taproot Bitcoin addresses are lower than those for Legacy addresses.
Currently, only one account can be created for each Bitcoin address type under the same wallet generated from a single set of mnemonic phrases.
Bitcoin tokens are not interoperable between different address types. If you need to transfer assets between different address types, simply do so through a standard transaction.
Important Notice:imKey sells physical security hardware products only and does not provide any virtual asset trading, custody, or funds-related services. References to third-party wallets, exchanges, or decentralized applications are for compatibility purposes only; related functions and services are provided independently by third parties.
When making transfers on the TRON network, you need TRX to pay network fees. If you do not have enough TRX or you transfer often, you can use DAppso’s TRX-Free Transfer feature to pay fees directly with USDT.
To use this feature, visit DAppso and create a lite USDT account, which is a unique Gas Free contract account linked to your wallet address. After transferring USDT into this account, you can use the account balance to transfer USDT and pay fees.
This feature is powered by GasFree, a TRON ecosystem service provider, and uses TRON’s TIP-712 structured signature technology. In simple terms, you authorize transfers with an offline signature. GasFree then covers the required TRX resources and broadcasts the transaction, while you pay the service fee in USDT.
Guide
Step 1: Create an account
Please ensure your phone’s Bluetooth has successfully connected to your imKey hardware wallet.
Open imToken and switch to your imKey TRON account.
Tap USDT to enter the token detail page.
Tap the Token Function button 🔘 in the bottom left corner and select Send without TRX to enter the DApp.
Follow the instructions to approve the wallet connection.
Tap Create Now -> to complete the account creation.
Step 2: Deposit USDT
On the lite account page, tap Deposit.
Enter the deposit amount (at least 3 USDT is recommended).
Tap Deposit, then sign and send the transaction.
After the transaction is confirmed, you can view the balance in your lite account.
Tip: Depositing USDT into the lite account is a regular on-chain transfer and requires TRX for the network fee. We recommend keeping at least 15 TRX in your wallet to complete the deposit.
Step 3: Transfer USDT
On the lite account page, tap Transfer.
Enter the recipient address and transfer amount.
Tap Submit, then sign to send the transfer transaction.
After the transaction is sent successfully, you can view the transfer record on the page.
FAQ
Q1. How are transfer fees calculated?
The first transfer usually requires both an activation fee and a transfer fee. Subsequent transfers only require a transfer fee. The exact amount is subject to the fee displayed on the DApp page.
Current fee reference:
First transfer: about 3 USDT, including a 1.5 USDT activation fee and a 1.5 USDT transfer fee.
Subsequent transfers: about 1.5 USDT per transaction.
Note: These fees are set and collected by the GasFree service provider to cover the cost of paying TRX resources, broadcasting transactions, and providing the service.
Q2. Why is TRX required when depositing USDT?
Because transferring USDT from your wallet address to the corresponding lite account is a regular on-chain transfer, a small amount of TRX is required to pay the network fee.
After the tokens are deposited into the lite account, you can use USDT to pay fees for future transfers from that account, without preparing additional TRX.
Q3. Is the lite account a custodial account?
No. The lite account is generated for your wallet address, and you have full control over it. Tokens in the account can only be transferred after you sign with your wallet’s private key.
The third-party service provider only pays the TRX fee and broadcasts the transaction. It cannot access or control your assets.
💡 Make sure to back up your wallet mnemonic or private key properly. Store it securely offline. Never take screenshots, photos, or share it with anyone.
Q4. How do I contact DAppso?
On the lite account DApp page, tap Feedback to access its official Telegram support.
Risk Warning: The content of this article does not constitute any form of investment advice or recommendation. imToken does not make any guarantees and promises for the third-party services and products mentioned in this article, nor assume any responsibility. Digital asset investment has risks. You should carefully evaluate these investment risks and consult with relevant professionals to make your own decisions.
This article explains how to securely connect your imKey to the Tokenlon web version and quickly complete swap transactions, ensuring safety and convenience.
What is Tokenlon?
Tokenlon is a decentralized trading and payment settlement protocol based on blockchain technology. Launched in 2019 and incubated by imToken, Tokenlon now supports instant token swaps and limit orders.
How to Connect imKey to Tokenlon Web Version
Open your computer browser and navigate to the Tokenlon web page, then click “Launch Dapp.”
Click on the “Connect Wallet” button.
Select the “imKey” wallet, connect your imKey hardware wallet to your computer using a data cable, and enter the PIN code. Note: imKey will automatically power on when connected to your computer.
How to Complete an Instant Swap
Once imKey is connected, select the “Swap” on the page.
Enter the trading interface, choose the token pair and amount you wish to exchange. The current rate and transaction fees will be displayed.
Review the transaction details carefully and click “Review” to submit.
At this point, transaction details will appear on your imKey hardware wallet. Review them and press the confirm “OK” button to sign.
After signing, Tokenlon will indicate that the transaction has been submitted and display its progress. You can track the transaction status directly on the Tokenlon interface.
With these simple steps, you can safely and efficiently perform instant swaps on Tokenlon's web version using imKey, ensuring the security and convenience of your digital assets.
Important Notice:imKey sells physical security hardware products only and does not provide any virtual asset trading, custody, or funds-related services. References to third-party wallets, exchanges, or decentralized applications are for compatibility purposes only; related functions and services are provided independently by third parties.
To perform cross-chain asset transfers using Orbiter Finance with imKey, open imKey, switch to the Ethereum network, search for and open the Orbiter Finance app. Select the token and network you want to transfer to, enter the amount, click confirm, and complete the signature on the hardware device. After the transaction is complete, switch to the target network to check your assets. If you encounter any issues, contact Orbiter Finance official support.
What is Orbiter Finance?
Orbiter Finance is a decentralized cross-rollup bridge for transferring the Ethereum-native tokens, which is the infrastructure of Layer 2, it offers low cost and almost instant transfers. Orbiter Alpha supports cross-rollup transfers between Ethereum, StarkNet, zkSync, Loopring, Arbitrum, Optimism, Polygon, BNB Chain, ZKSpace, Immutable X, dYdX, Metis and Boba.
Orbiter Finance allows you to move your tokens across different blockchains. Here are the steps to transfer USDT from Polygon to zkSync through the bridge:
Open the imKey wallet, click on "Bridge," find "Orbiter," and open the app.
Click "Confirm" to allow the app to access your wallet address.
Select the token you want to transfer cross-chain, as well as the networks for sending and receiving the assets.
After entering the amount of tokens to transfer, click "SEND," then "CONFIRM AND SEND," and finally "Request Confirmation from imKey." Complete the signature confirmation on the hardware device.
Wait for the status to change from "Processing" to "Completed," and for three green checkmarks to appear below, indicating that the transaction is complete. Then, return to the imKey homepage, switch to the zkSync Era network, and you will be able to see your assets.
If you encounter any issues while using Orbiter Finance, please contact Orbiter Finance support through the following channels:
Lastly imKey is a professional hardware cold wallet incubated by imToken, deeply integrated with imToken and also supporting the Layer2 ecosystem. If you have higher security requirements for your wallet or need to store large amounts of assets, we strongly recommend using the imKey hardware wallet. imKey will provide you with exceptional security and a convenient user experience.
Risk Disclaimer: The content of this article does not constitute any form of investment advice or recommendation. imToken makes no guarantees or commitments regarding the third-party services and products mentioned in this article and assumes no responsibility. Token investments carry risks; please carefully assess these risks and consult relevant professionals before making any decisions.
Important Notice:imKey sells physical security hardware products only and does not provide any virtual asset trading, custody, or funds-related services. References to third-party wallets, exchanges, or decentralized applications are for compatibility purposes only; related functions and services are provided independently by third parties.
Feee.io is an energy rental platform on TRON, where users can obtain the energy they need at a lower cost from TRX stakers. This effectively reduces the burning of TRX in their accounts and decreases transaction fees when transferring USDT.
The rental period for energy can range from 1 hour to 1 month. Click here for more information about Feee.io.
How to Use Feee.io in imToken?
1. Enter imToken, switch to the TRON account, and click "Rent” to launch Feee.io.
2. The default recipient is your current wallet address. Enter the amount of energy and rental duration you need, click "Pay", and confirm the payment again in the pop-up window. Once the order is completed, the energy will be credited to the corresponding account.
FAQ
Q1. When will the energy be credited after a successful payment?
A: The energy will be credited within a few minutes after payment. Due to broadcasting delays and other reasons, there may be a delay of 5 to 10 minutes in rare cases.
Q2. How long does it take for energy to recover after use?
A: The energy will be restored within 24 hours after use.
Q3. How to rent bandwidth?
A: You can enter the "Trading Market" from the menu bar in the upper left corner of Feee.io, click "Buy" and select bandwidth.
Q4. Can an order be canceled?
A: Once an order is created, it cannot be canceled.
Q5. What should I do if the order fails but tokens are still deducted?
A: You can send an email to service@feee.io or contact the official customer service of Feee.io on Telegram at @trongascom.
Risk Warning: The content of this article does not constitute any form of investment advice or recommendation. imToken does not make any guarantees and promises for the third-party services and products mentioned in this article, nor assume any responsibility. Token investment has risks. You should carefully evaluate these investment risks and consult with relevant professionals to make your own decisions.
Important Notice:imKey sells physical security hardware products only and does not provide any virtual asset trading, custody, or funds-related services. References to third-party wallets, exchanges, or decentralized applications are for compatibility purposes only; related functions and services are provided independently by third parties.
This article provides a step-by-step guide on how to use imKey to perform token swaps on the decentralized exchange Tokenlon.
Besides securely storing assets, imKey also supports the use of Tokenlon's swap feature for tokens trading.
What is Tokenlon?
Tokenlon is a decentralized trading and settlement protocol that provides users with fast, competitively priced, and diverse decentralized cryptocurrency exchange services.
How to use imKey Pro to swap in Tokenlon?
Open the ETH wallet on imKey and enter the "Market" page. On the market page, set the token and amount you want to exchange, then click "Review".
After reading the Tokenlon Service Terms, click "I have read and agree to the Tokenlon Service Terms" and confirm.
After verifying that the order information is correct, click "Request imKey Confirmation" and confirm by signing with imKey. Please wait patiently until the exchange is successful. Note: The signing process requires multiple confirmations.
Note: The signing process requires multiple confirmations.
Note: If prompted "Order has expired, please place your order again," it means that the transaction request has timed out, and you will need to click "Request imKey Confirmation" again and complete the signing with imKey.
Return to the ETH wallet and check if the assets have arrived. If not, click '+' - 'All My Assets', then click the '+' symbol on the right side of the token to add the token to the wallet homepage.
Important Notice:imKey sells physical security hardware products only and does not provide any virtual asset trading, custody, or funds-related services. References to third-party wallets, exchanges, or decentralized applications are for compatibility purposes only; related functions and services are provided independently by third parties.
GoPlus (GoPlus Network) is a decentralized security layer for Web3 that provides real-time risk identification and blocking for wallets, DApps, and multiple blockchains. Through security data & detection APIs, on-chain firewalls, a browser extension, and address monitoring, it detects token/contract risks and blocks suspicious approvals or malicious transactions—helping users and developers reduce phishing and mis-sign risks across the full transaction lifecycle and improve asset security and user experience.
Prerequisites
Before you start, make sure:
Your imKey hardware wallet is powered on and unlocked.
The imToken App is installed and set up on your phone, and your imKey is successfully paired.
Both imKey firmware and the App are up to date.
Network support: GoPlus currently supports Ethereum mainnet (ETH) and BSC.
Desktop connection: Have the original imKey data cable, or ensure your USB cable supports data transfer (not charge-only).
Option 1: Connect imKey on a desktop
Step 1: Visit GoPlus and start the connection
In your desktop browser, go to https://app.gopluslabs.io/.
Click Connect wallet to scan risks on the right panel.
Complete the image verification (CAPTCHA) if prompted.
Step 2: Select imKey
When the wallet selection dialog appears, choose imKey.
Step 3: Connect the device and authorize
Use the original imKey data cable to connect imKey to your computer, then enter your PIN on imKey.
In the connection prompt, click Connect, and on the imKey screen press OK to authorize the connection.
Step 4: Review your account security status
After connecting, GoPlus will display your account status.
Review current and potential risks. Click Rescan to refresh, or Handle to follow recommended actions.
Option 2: Connect via the imToken in-app browser (mobile)
Step 1: Open the in-app browser
In imToken, select your imKey ETH account.
Tap Browser in the bottom navigation and enter: https://app.gopluslabs.io/.
Step 2: Open GoPlus and set language
On the GoPlus page, tap the globe icon in the top-right and choose Simplified Chinese or your preferred language.
Tap “Connect wallet to scan risks”. Complete the image verification (CAPTCHA) if prompted.
Step 3: Choose wallet and authorize
Select “imToken ”as the wallet.
When the authorization prompt appears, tap“ Confirm”.
Step 4: Request imKey confirmation
On the signature screen, tap “Request confirmation from imKey”.
On your imKey device, press OK to confirm the signature.
Step 5: View your Security Level
After connecting, view your Security Level, or tap Rescan to run another check.
About “Security Level” and Risk Notices
1) How to interpret the Security Level
It’s a point-in-time assessment based on on-chain public data and detection rules—meant to flag potential risks, not to definitively label an address as safe or unsafe.
The level updates dynamically with your address activity and approvals; a single scan does not represent a long-term state.
A higher level ≠ guaranteed loss; a lower level ≠ absolute safety. Always judge within your actual usage context.
2) How to read common risk prompts
Approval risks: You may have granted high privileges (e.g., unlimited allowance) to a contract. Review regularly and revoke unnecessary approvals; prefer least privilege or one-time/limited allowances going forward.
Address association / dusting: Your address is associated with high-risk addresses on-chain, or it received unsolicited small dusting transfers. This does not mean you engaged in risky actions, but be more cautious with future interactions.
Behavior reminders: Short-term abnormal approvals or unusually frequent interactions are attention signals, not definitive risks.
3) What to do if high risks appear
Pause first: Temporarily stop new signatures/approvals. Trust the imKey screen—if the device and page don’t match, cancel immediately.
Verify sources: Use only official or trusted links and contract addresses. When needed, check project announcements, audits, or community discussions.
Revoke before proceeding: Use approval-management tools to revoke unnecessary high-privilege approvals before continuing.
Test small: For large transactions, first try a small amount to validate the path and fees, then scale up.
4) Boundaries & notes
Security Levels and prompts rely on public data and rule engines and may contain false positives/negatives. Results are for reference only and do not constitute investment, financial, or legal advice.
Connecting and authorizing do not involve your mnemonic or private keys; all critical actions require physical confirmation on imKey.
If you still have questions, contact imKey or GoPlus official support for assistance.
Important Notice:imKey sells physical security hardware products only and does not provide any virtual asset trading, custody, or funds-related services. References to third-party wallets, exchanges, or decentralized applications are for compatibility purposes only; related functions and services are provided independently by third parties.
When using an imKey hardware wallet to manage BTC, you may find that the BTC address shown in the imToken App is different from the address shown on your imKey device.
Please don’t worry. As long as your imKey recovery phrase has been backed up correctly, your assets are still controlled by the corresponding private key and will not be lost simply because the displayed addresses are different.
Why are the addresses different?
BTC wallets support address derivation. This means multiple BTC addresses can be generated under the same wallet.
Since imToken 2.15.0, imToken has supported BTC derived addresses. When used with imToken, imKey can also manage multiple BTC addresses under the same wallet. Using multiple addresses helps improve privacy and reduces the risks associated with repeatedly using the same address over time.
If you previously added, switched, or deleted a BTC address in imToken, while the imKey device shows the default BTC address, the addresses displayed on the two sides may be different.
In addition, since imToken 2.16.0, imKey has supported Taproot and Native SegWit Bitcoin accounts. If you select a different address type when re-adding a BTC account, such as Taproot, Native SegWit, Nested SegWit, or Legacy, the address you see may also be different from the one you used before.
This is usually caused by BTC address derivation, address type differences, and the display logic of the imKey device. It does not mean your wallet is abnormal, nor does it mean your assets have been transferred.
Why does the imKey device only show one BTC address?
The core purpose of the imKey hardware wallet is to protect your private keys and help you securely confirm key actions, such as receiving addresses, transfer details, and signatures.
Currently, each BTC account on the imKey device only writes and displays one default address. It does not support displaying multiple BTC derived addresses on the hardware device at the same time. Therefore, even if you add or switch to other BTC addresses in imToken, the imKey device may still only show the default address.
Please note: the fact that the device only displays one address does not mean it can only manage that one address.
As long as these BTC addresses are derived from the same imKey wallet, the corresponding assets are still controlled by the private key in your imKey hardware wallet.
What should I do?
1. Check the current BTC address
Go to the BTC wallet page in imToken and check whether the currently displayed BTC address is the one you used before.
If you previously switched BTC addresses or deleted a BTC address, the address currently shown in imToken may be different from the default address shown on the imKey device.
2. Re-add the corresponding BTC address type
If the BTC address you used before was deleted from imToken, or if the BTC address changes and the balance shows 0 after re-pairing imKey, it is usually because the BTC address type you added is different from the one you used before.
You can re-add it by following these steps:
Make sure your phone’s Bluetooth is connected to yourimKey hardware wallet.
Open imToken and tap Me - Wallet Management.
Select the paired imKey hardware wallet and tap Add Account.
In the Layer 1 list, find Bitcoin and tap +.
Select the BTC address type you used before:
Taproot: usually starts with bc1p
Native SegWit (Bech32): usually starts with bc1q
Nested SegWit (P2SH): usually starts with 3
Legacy: usually starts with 1
Confirm the selection, then return to the wallet homepage to view the corresponding BTC account.
For example, if the BTC address you used before starts with 3, please select Nested SegWit (P2SH).
After re-adding it, imToken will display the address and its on-chain asset records again.
Note: If you need to transfer assets from a Taproot or Native SegWit Bitcoin account, please make sure your imKey firmware has been upgraded to version 1.9.05 or above.
3. Add a derived address
If you still cannot find the BTC address you used before after re-adding the address type, you can try adding derived addresses under that address type.
Steps:
Open imToken and tap Me - Wallet Management.
Select the paired imKey hardware wallet and tap Add Account.
In the Layer 1 list, find Bitcoin and tap +.
Select the BTC address type you used before.
Follow the on-screen instructions to continue adding derived addresses, then return to the wallet homepage to check whether the address matches the one you used before.
After adding multiple derived addresses, it is normal if the imKey device still only shows one default address. This does not affect your ability to view, receive, or transfer assets in imToken.
4. Confirm the address before receiving or transferring BTC
Before receiving or transferring BTC, please make sure you are using the correct BTC address.
If the address shown in the imToken App is different from the one shown on the imKey device, first confirm the address source, address type, and derived address. Do not transfer directly. If necessary, you can make a small test transfer first.
Will the BTC I have already received be lost?
No.
If the BTC was sent to an address previously generated by this imKey wallet, the assets are still on the blockchain and controlled by the corresponding private key.
Even if an address is not temporarily displayed in imToken, it does not mean the assets are lost. You can restore access to the assets under that address by re-adding the corresponding BTC address.
If you are not sure whether a BTC address belongs to your current imKey wallet, or if you are not sure which address type to select, please contact imKey official support for assistance.
imKey’s blockchain apps (e.g., ETH, BTC) can be upgraded via the imToken app. Upgrading ensures normal functionality, compatibility with new networks, and fixes known issues.
Before You Start
Make sure your phone’s Bluetooth is on.
Unlock your imKey and confirm it’s connected to your phone.
Standard Upgrade Method
Open imToken and tap “My Profile” → “ Manage wallets.”
In the wallet list, select your paired imKey hardware wallet and tap “>.”
On the imKey management page, tap “App settings.”
In the app list, check if any apps show “Update.” If so, tap “Update.”
Follow the in-app prompts to download and install. Your imKey screen will display “APP installing .”
When the progress completes and you see “Upgrade successful,” return to the Assets page to use it.
Notes
Keep imKey unlocked, Bluetooth connected, and your phone’s network stable during the upgrade.
Do not exit the app or let your phone auto-lock to avoid interruptions.
If the upgrade fails or is interrupted, go to “My Profile” → “Manage wallets” → your imKey → “App settings” and try again.
This imKey app version update only improves functionality and user experience; it does not affect your mnemonic phrase, private keys, or existing assets, and the upgrade process is safe and reliable.
Important Notice:imKey sells physical security hardware products only and does not provide any virtual asset trading, custody, or funds-related services. References to third-party wallets, exchanges, or decentralized applications are for compatibility purposes only; related functions and services are provided independently by third parties.
A binding code is an 8-character randomly generated combination of numbers and letters. It is used for one-to-one binding between the imKey and the imToken or imKey Manager, ensuring unauthorized clients cannot access imKey. Please make sure to back up your binding code carefully, as it will be required for rebinding your imKey in the future. The binding code is automatically generated by imKey and cannot be manually modified.
Note: You will need the binding code to rebind in the following situations:
Unpairing
Logging out of imToken identity
Uninstalling the imToken client
Switching to a new phone
How to View the Binding Code?
If the binding code has not been completed yet: A binding code will be generated during the binding process. Please back it up carefully.
If the binding code has already been completed: Open the imToken client and follow these steps:
Go to Me > Manage Wallets
Select the paired imKey wallet
Enter imKey Management and select "Binding Code" to view it (Note: You need to enable Bluetooth on your phone and connect to the imKey during this process.)
If the binding code cannot be viewed or was not backed up properly: Don’t worry! As long as you have backed up your mnemonic phrase, you can reset the imKey and generate a new binding code. Follow these steps:
Prepare the mnemonic phrase for your imKey hardware wallet.
Reset your imKey.
Set the language and PIN code.
Restore the wallet on your imKey using the mnemonic phrase.
Rebind the imToken wallet. During this process, a new binding code will be generated.
Back up the new binding code.
How imKey Secure Pairing Works
When you connect imKey for the first time, imToken establishes a Bluetooth connection with the device and completes device certificate verification, session key negotiation, and binding code confirmation. This creates a trusted pairing between the imToken App and the hardware wallet.
1. Verify the Device’s Identity
After imKey is paired with imToken via Bluetooth, its device certificate is sent through imToken to the server for verification. Once verified, the imToken App obtains the public key of the imKey Secure Element (SE) to confirm the identity of the connected device.
2. Establish an Encrypted Session
The imToken App generates a key pair and uses ECDH to derive the same session key as the imKey Secure Element. Data transmitted during the pairing process is protected by this session key.
3. Confirm the Binding Code
imKey generates and displays an eight-character binding code on its screen. You must manually enter this code in the imToken App to confirm that you are pairing with the imKey device currently in your possession.
The binding code is used only to establish or restore the pairing between the imToken App and imKey. It is not a recovery phrase, private key, PIN, or wallet password.
4. Complete Encrypted Verification and Pairing
The imToken App generates verification data using the binding code, the imToken App’s public key, and the public key of the imKey Secure Element. It then encrypts the data with the session key and sends it to imKey.
Once verification succeeds, the Secure Element stores the binding code and the App public key, completing the one-to-one pairing.
5. Verify Subsequent Transaction Requests
After pairing is complete, the imToken App uses the binding key to authenticate transaction requests awaiting signature. imKey verifies the source of each request using the public key of the paired imToken App.
Only after verification succeeds will imKey parse the transaction and display key details on its screen, including the recipient address, transfer amount, and network fee.
6. Sign After User Confirmation
You must independently review the transaction details on the imKey screen and press the button to confirm. Only then will the Secure Element use the wallet private key stored in imKey to sign the transaction.
The wallet private key always remains inside the imKey Secure Element and is never transmitted to the phone. After the signature is returned to the imToken App, the App assembles the transaction and broadcasts it to the blockchain network.
What Protection Does This Mechanism Provide?
Through imKey certificate verification, manual binding code confirmation, encrypted transmission of pairing data, imToken App authentication, and on-device transaction confirmation, imKey’s secure pairing mechanism helps:
Verify the identity of the connected device;
Reduce the risk of unauthorized imToken Apps accessing imKey;
Reduce the risk of pairing data being intercepted or tampered with during transmission;
Ensure that transaction requests are initiated through the paired imToken App;
Ensure that transactions are signed only after the user has reviewed and confirmed the details on the imKey screen.
Even when a transaction is initiated through the imToken App, you must still review and confirm it on the imKey device before it can be signed. Always rely on the address, amount, and network fee displayed on the hardware wallet screen.
If you encounter any issues when viewing the binding code, resetting the device, or pairing it again, email imKey Support at support@imkey.im.
imKey Support will never ask for your recovery phrase, private key, PIN, or wallet password.
Important Notice:imKey sells physical security hardware products only and does not provide any virtual asset trading, custody, or funds-related services. References to third-party wallets, exchanges, or decentralized applications are for compatibility purposes only; related functions and services are provided independently by third parties.
With the rapid advancement of technology, electronic devices are being updated faster than ever. One notable trend is that people are changing their phones more frequently. For users managing digital assets with decentralized wallets, this often involves importing their seed phrases into new devices to continue managing their funds. But a common and alarming question arises:
“Why did my assets disappear after importing my wallet?”
Is it possible for your assets to vanish into thin air when you import your wallet to a new device? Unfortunately, the answer is yes.
But this unsettling answer comes with some key conditions. If you inadvertently trigger any of the scenarios below, your assets could indeed seem to "disappear."
Condition 1: Selecting "Create Wallet" Instead of "Import Wallet"
"Import Wallet" and "Create Wallet" are two entirely different actions. Some may wonder, "How could anyone confuse the two?" Yet, during discussions with the imToken customer support team, it became clear that most cases of missing assets happen because users accidentally choose "Create Wallet" instead of "Import Wallet."
When you create a new wallet, the system generates a brand-new wallet address, which, of course, has no connection to your original wallet and no assets.
Condition 2: Mixing Up Multiple Seed Phrases
In the blockchain world, owning multiple wallet addresses is common practice. Most blockchain enthusiasts wouldn't even dare claim expertise without having several wallet addresses. Typically, one set of seed phrases can only correspond to one single wallet address.
If your digital assets are spread across multiple wallets, you should have multiple seed phrases backed up. However, if you fail to maintain proper records linking each seed phrase to its respective wallet, confusion is inevitable.
The result of seed phrase confusion is straightforward: while the seed phrases you input may be valid, it may not correspond to the wallet containing your assets. If the seed phrases correspond to an empty wallet address, your assets will naturally appear to have "disappeared."
Condition 3: Errors in Backing Up the Seed Phrase
Seed phrases are usually composed of 12 or 24 words. Only 2,048 specific English words are used for seed phrases, as defined by the BIP-39 standard.
For example, in the case of imToken, the app supports the import of 12-word seed phrases. If your backup contains errors, two outcomes are possible:
The imToken app rejects the seed phrase and displays an "Invalid Seed Phrase" error.
The app successfully imports the wallet, but the wallet address does not match your original one, leaving you with an empty wallet.
While the first scenario is easier to fix—simply correct the invalid words by referring to the official BIP-39 word list—the second scenario is trickier.
When facing the second issue, the first step is to confirm if the newly imported wallet address matches your original address. If the addresses match, check the blockchain explorer for the asset details. However, if they differ, your seed phrase may contain errors.
Common mistakes occur when handwritten backups are unclear or words are easily confused, such as "awake" vs. "aware" or "blue" vs. "blur." Such errors might inadvertently lead to importing a valid but incorrect wallet address—likely an empty one (99.99% of the time). This is a classic scenario where your assets seem to have "disappeared."
Condition 4: Changes in Wallet Derivation Path
Typically, a set of seed phrases correspond to one wallet address. However, in certain scenarios, altering the derivation path can generate entirely different wallet addresses from the same seed phrases. To understand how this happens, it’s essential to grasp the concept of wallet derivation paths.
What is a Wallet Derivation Path?
A wallet derivation path is a technical feature of hierarchical deterministic (HD) wallets, enabling the master private key to generate multiple accounts or wallet addresses through specific algorithms. Wallets like imToken simplify multi-chain and multi-account management by allowing users to create multiple accounts on different blockchains—or even multiple subaccounts on the same blockchain—using one set of seed phrases.
The derivation path system is based on two key protocols: BIP-32 and BIP-44.
BIP-32: Defines the hierarchical structure of accounts derived from the master private key. Different account levels are accessed using specific paths (e.g., m/*).
BIP-44: Provides a standard format for paths, ensuring consistency across wallets. This protocol enables wallets to derive the same address from the same seed phrase if the standard derivation path is used. The structure is as follows: m / purpose' / coin_type' / account' / chain / address_index
Here’s what the components mean:
m: Indicates the account is derived from the master private key.
purpose: Always 44 for wallets following BIP-44, including imToken.
coin_type: Represents the type of cryptocurrency (e.g., 0 for BTC, 60 for ETH).
account: Specifies the account index, starting from 0.
change: Indicates whether the address is externally visible (0) or an internal change address (1); typically, this is set to 0.
address_index: Refers to the specific address under the account, starting from 0.
For example, the default derivation path for an Ethereum main account looks like this: m/44'/60'/0'/0/0 This path corresponds to the first externally visible Ethereum address derived from the master private key under the BIP-44 standard.
Customizing Derivation Paths in imToken
In imToken, you can customize derivation paths to manage accounts more flexibly. There are two primary customization options:
Ledger Standard: This option generates accounts following Ledger’s derivation standards.
BIP-44 Standard: Users can manually input the last three parameters of the derivation path to create custom accounts.
If the derivation path changes—intentionally or accidentally—the wallet app will generate a different wallet address, even if the same seed phrases are used. This is why it’s crucial to note the correct derivation path when backing up your wallet. Without it, you may inadvertently access an empty wallet address and believe your assets are lost.
Why This Matters
If the derivation path changes—intentionally or accidentally—the wallet app will generate a different wallet address, even if the same seed phrases are used. This is why it’s crucial to note the correct derivation path when backing up your wallet. Without it, you may inadvertently access an empty wallet address and believe your assets are lost.
How to Avoid Asset Loss
To prevent these issues, adopt the following best practices:
Properly Back Up Your Seed Phrase
Always write your seed phrase down on paper and avoid saving it on any digital or online device to minimize security risks.
For long-term durability, consider storing your seed phrase in a metal storage device designed for backups.
Record the Wallet’s Default Derivation Path
When creating a new wallet, take note of the default derivation path. This ensures you can accurately restore the wallet address later, even with different wallet software.
Double-Check Your Backup
After backing up your seed phrase, verify it by importing the wallet into the app to ensure it restores the correct address.
Cross-Verify Wallet Information
Record the wallet address, derivation path, and part of the seed phrase (e.g., the first word) together. Store this information securely but separate from the full seed phrase. For example: ETH Wallet: 0x123456…789 - m/44'/60'/0'/0/0 - "abandon"
Avoid Unnecessary Changes to Default Settings
Do not alter the default derivation path unless you fully understand its implications. If changes are necessary, carefully document the new path for future reference.
Final Thoughts
By following these practices, you can safely restore your assets across any new device or wallet app. Managing a decentralized wallet requires diligence and care—your seed phrase is your only key to accessing your funds. Even a small mistake in its handling could result in permanent loss of your digital assets.
Don’t let a moment of negligence cost you your hard-earned assets. Take the time to secure your wallet and back it up properly—your future self will thank you.
Stay safe, stay informed, and manage your digital assets with confidence!
Important Notice:imKey sells physical security hardware products only and does not provide any virtual asset trading, custody, or funds-related services. References to third-party wallets, exchanges, or decentralized applications are for compatibility purposes only; related functions and services are provided independently by third parties.
An SN code (Serial Number) is a unique identifier for each device, similar to an ID number, and is also known as a machine code, authentication code, or registration code. The SN code for an imKey device consists of 16 alphanumeric characters randomly generated according to specific rules, used to verify the device’s legitimacy and protect user rights.
How to check imKey Pro SN code?
The SN code is on the back of imKey Pro, placing at the bottom. It's composed of a mix of upper case alphabets and numbers.
Important Notice:imKey sells physical security hardware products only and does not provide any virtual asset trading, custody, or funds-related services. References to third-party wallets, exchanges, or decentralized applications are for compatibility purposes only; related functions and services are provided independently by third parties.
When performing device verification for imKey, you may encounter a message stating "No device information found." This article will detail the possible reasons for this message and provide solutions to ensure a smooth user experience and protect your device's rights.
Why Does the "No device information found" Message Appear?
When encountering this message during imKey device verification, please remain calm. This message is typically caused by one of the following common issues:
Incorrect SN Code Length: If the SN code is entered with missing or extra characters, the verification system will not be able to match the correct device information, resulting in the "No device information found" message. Ensure that the SN code is exactly 16 characters long and entered completely.
Incorrect SN Code Characters: The SN code is case-sensitive. Entering incorrect characters (such as inputting "0" as "O" or "1" as "I") can lead to a failed query. To avoid confusion, imKey’s serial number rules exclude the characters "O" and "I," but you should still carefully verify your input.
What to Do Next?
If you have confirmed that the SN code was entered correctly but the system still shows “No device information found,”please contact our official customer support team for manual verification and assistance.
Important Notice:imKey sells physical security hardware products only and does not provide any virtual asset trading, custody, or funds-related services. References to third-party wallets, exchanges, or decentralized applications are for compatibility purposes only; related functions and services are provided independently by third parties.
When you change to a new phone, there are two ways to rebind imKey:
1. Use PIN code and binding code;
2. Use mnemonics.
To rebind imKey using PIN code and binding code, the operation steps are as follows:
1. Use PIN code to open imKey;
2. Download imToken on the new phone, and look for the only official website of imToken when downloading: token.im
3. After creating or restoring the imToken wallet, after the installation is complete, open imToken and you can choose to create a wallet or import a wallet
4. Open imToken and click "My Profile" - "Manage Wallets"
5. On the "Wallet Management" page, click the "+ Add Wallet" sign in the upper right corner, select "Connect with other wallets", and select "imKey" after entering;
6. Select the connected device, a Bluetooth pairing request will appear, enter the Bluetooth pairing code displayed on imKey, and click "Pair";
7. Enter the binding code and import the wallet;
8. After the wallet is imported, the binding is successful.
Use mnemonics to rebind imKey. The operation method is as follows (this method is suitable for the case of forgetting the PIN code or binding code):
1. Reset imKey, enter the wrong PIN code 5 times in a row, set a new PIN code, and restore the wallet with mnemonics (note that the mnemonics should be entered into the imKey hardware wallet, not into the imToken app);
2. According to the first method, open imToken and pair imKey.
This article uses imToken decentralized wallet as an example. Other digital asset wallets may have slight differences, so please refer to the official customer support of the respective wallet for more details.
Misunderstandings arise between people due to lack of understanding, and this is often the case when we come across new concepts, such as decentralized wallets. Moreover, blockchain technology is vastly different from the traditional centralized services we are used to, which makes these misunderstandings deeply rooted in our minds.
Below are the five most common misconceptions that new users have when using decentralized wallets. Have you encountered any of these?
Misconception 1: My assets are "stored" in the imToken wallet.
The primary function of a wallet is asset management, allowing users to make transfers or receive payments. This is similar to the accounts set up on centralized exchanges, but with a key difference: your digital assets are not stored in the hands of a decentralized wallet provider, and there is no custodial relationship between you and them.
A decentralized wallet does not control your wallet’s mnemonic phrase, which is a major difference from centralized platforms. On centralized platforms, your assets are controlled and managed by the platform, and users cannot access the mnemonic phrases or other information related to the platform's addresses.
When using a decentralized wallet, you manage your assets through the wallet application. The mnemonic phrase and private keys are under your control, and you can use the private keys to authorize and initiate transactions.
Key Point to Remember: Whoever controls the mnemonic phrase controls the assets.
Misconception 2: I made a mistake with the address while transferring. Can customer service help me get it back?
Blockchain wallet addresses are generally long strings of characters that are more complex and harder to remember than bank account numbers.
In most cases, people obtain the recipient's address by scanning a QR code or copying it. While mistakes are rare, some careless individuals may accidentally copy a token contract address, leading to assets being sent to an incorrect address. Once a transaction is confirmed on the blockchain, it cannot be frozen or reversed. The only way to recover the assets is by contacting the recipient. However, due to blockchain’s inherent anonymity, it’s often impossible to confirm the identity of the wallet owner. If assets are sent to the wrong address, they are effectively lost.
Thus, it is important to double-check the address before making a transfer. You can use wallet features, such as imToken's address book, to store frequently used addresses and enter them with a single click.
You can also use the ENS domain service to make your wallet address easier to remember.
Misconception 3: My asset balance is wrong. Can imToken adjust it for me?
To answer this question, let’s first understand where the asset information in your wallet comes from.
All your digital assets are essentially just cold data on the blockchain, and they don’t appear in a very user-friendly form. For example:
Unless you're a programmer, most people won’t understand this raw code. To make this information more understandable, developers have transformed this data, adding visual designs to present it in a more intuitive and user-friendly way.
We know that the asset information for each address is directly pulled from the blockchain, and it matches the data shown on blockchain explorers. The wallet simply presents this information in a more accessible way for users. If you feel your asset balance is wrong, you can cross-check it by using a blockchain explorer.
Misconception 4: All DApps accessible via the DApp browser are related to imToken.
To clear up this misunderstanding, we first need to understand what a "DApp browser" is.
If we disregard the first four letters, a browser is a tool for accessing websites, like Chrome, Safari, Firefox, or IE. We use browsers to visit websites such as Zhihu or Taobao. Similarly, a "DApp browser" is simply a tool for accessing DApps, which are native products of blockchain technology. Most wallets embed a DApp browser as a native feature.
While you can use the DApp browser to access third-party DApps integrated with your wallet, this doesn't mean that the DApp is associated with the wallet provider. It's like using Chrome to visit Taobao—while you can access Taobao, it doesn’t mean that Chrome is affiliated with Taobao.
A reminder: many fraudulent DApp projects take advantage of this misconception to trick users, creating the false impression that the project is affiliated with the wallet.
Misconception 5: imToken can only manage ETH assets.
Many users still associate imToken with its version 1.0, thinking that it can only manage ETH and ERC20 tokens. Users often ask, "When will imToken support BTC or TRX?"
I want to tell you: imToken now supports assets from 14 mainnets, including ETH, BTC, EOS, COSMOS, BCH, LTC, CKB, TRX, KSM, DOT, FIL, XTZ, GOGE, and Osmosis. With a single mnemonic phrase, you can manage assets from these 14 mainnets.(Note: imKey currently does not support XTZ, DOGE, or Osmosis.)
This article is referenced from the imToken Help Center, and the content is applicable to the imKey hardware wallet as well.
Important Notice:imKey sells physical security hardware products only and does not provide any virtual asset trading, custody, or funds-related services. References to third-party wallets, exchanges, or decentralized applications are for compatibility purposes only; related functions and services are provided independently by third parties.
Common Causes of Digital Asset Loss and Strategies to Prevent Them
Managing digital assets involves multiple potential risks that could lead to loss. Here are some common scenarios and corresponding strategies to help users better secure their digital assets:
1. Improper Backup of Recovery Phrases
Risk: Decentralized wallets do not store users' recovery phrases. If the recovery phrase is lost, the digital assets become irretrievable. Statistics show that the most common cause of asset loss is not theft but users failing to secure their recovery phrases. If lost or if the wallet device is damaged, assets cannot be recovered. Worse, if the recovery phrase is poorly managed and leaked to others, assets can be easily stolen.
Strategies:
Physical Backup: Use physical mediums such as handwritten notes or dedicated recovery phrase storage boxes.
Offline Storage: Keep backups offline to avoid exposure to online hacking.
Multiple Backup Locations: Store backups in different physical locations to protect against catastrophic events.
2. Granting Transfer Permissions to Malicious Contracts
Risk: When interacting with decentralized applications (DApps), users may inadvertently grant transfer permissions to malicious contracts. Such contracts could steal assets without user confirmation. The DApp ecosystem often includes many unknown or untrustworthy contracts, making mistaken authorization a common cause of asset loss.
Strategies:
Audit Contract Code: Where possible, have professional auditors review the contract code for safety.
Choose Trusted Contracts: Interact only with well-known, verified contracts.
Regularly Check Wallet Permissions: Periodically review and revoke permissions for unknown contracts to mitigate risks.
Authorize Carefully: Ensure the contract is trustworthy before granting transfer permissions, and be ready to revoke access.
3. Falling Victim to Scams
Risk: Scammers use various methods to trick users into revealing recovery phrases, private keys, or transfer permissions, leading to asset theft. Many users are caught off guard and fall prey to these schemes.
Strategies:
Protect Recovery Phrases/Private Keys: Never share your recovery phrase or private key with anyone. Any request for them is likely a scam.
Be Wary of Links and Software Downloads: Avoid clicking on links from unknown sources or downloading unverified software to prevent phishing attacks.
Use Verified Websites: Ensure the digital asset platforms you visit have valid security certificates and use secure URLs.
Monitor Accounts Regularly: Check your wallet accounts regularly for unusual transactions.
Seek Professional Help: If scammed, report the incident promptly to authorities or professional organizations.
4. Hacking Attempts
Risk: On the blockchain, recovery phrases represent asset ownership. If a hacker gains access to your recovery phrase, they can import it to another device and steal your assets. Hackers often use phishing or malware to obtain recovery phrases or private keys.
Strategies:
Use Hardware Wallets: Store private keys in offline hardware wallets (e.g., imKey) to prevent exposure on online devices.
Download Official Apps: Always download wallet apps from official sources to avoid malware or phishing applications.
Manually Enter Recovery Phrases: Avoid copy-pasting recovery phrases; input them manually to reduce the risk of leakage.
Avoid Jailbreaking or Rooting Devices: Do not jailbreak or root devices, as this can expose vulnerabilities for hackers to exploit.
Visit Trusted Links: Only access trusted, verified links to avoid phishing websites.
Additional Security Recommendations
1. Hot and Cold Wallet Separation
To maximize security, adopt a hot-and-cold wallet strategy. Use software wallets like imToken for small transactions and hardware wallets like imKey for managing larger amounts. Combining these ensures both convenience and safety.
2. Regular Software and OS Updates
Keep wallet software, operating systems, and device security patches up to date to fix known vulnerabilities and protect against attacks.
3. Manage Installed Applications
Reduce unnecessary apps, disable auto-start settings, and remove unused applications. Avoid installing unknown software, especially those with remote desktop features, to prevent data theft.
4. Disable Cloud Storage
Avoid storing sensitive information like recovery phrases and private keys in cloud storage to minimize risks of cloud service leaks.
5. Use Strong Passwords
Set strong passwords combining uppercase letters, lowercase letters, numbers, and special characters, and update them regularly. Strong passwords enhance account security and protect against brute force attacks.
By implementing these strategies, you can significantly reduce the risks associated with digital assets. Stay vigilant, regularly review and update your security measures, and build a solid defense for your digital wealth.
Important Notice:imKey sells physical security hardware products only and does not provide any virtual asset trading, custody, or funds-related services. References to third-party wallets, exchanges, or decentralized applications are for compatibility purposes only; related functions and services are provided independently by third parties.
The imKey Pro hardware wallet uses a security chip manufactured by Infineon (model: SLE78CLUFX5000PH). This chip meets the military-grade CC EAL 6+ standard, which is recognized as the highest security level for hardware wallets equipped with secure chips. As one of the most secure solutions for safeguarding digital assets, hardware wallets can protect sensitive information, such as private keys, from unauthorized access or tampering by hackers, ensuring better asset security. However, no system is entirely immune to risks. For hardware wallets, supply chain vulnerabilities remain a critical challenge.
This article introduces the measures imKey Pro has implemented to address supply chain attacks, focusing on two key aspects: purchase channels and product unboxing.
How to Purchase imKey Pro
To ensure product quality and after-sales service, we strongly recommend purchasing through official channels. Currently, imKey offers three purchasing options:
Youzan Store If your delivery address is within China, you can purchase via the official Youzan store. Products are shipped domestically via SF Express, which is fast, secure, and reliable.
Amazon Store For customers outside China, the official imKey Amazon store is a convenient option. Amazon, a globally trusted e-commerce platform, ensures a smooth purchase and delivery process.
Official Website Alternatively, overseas customers can buy directly from the official imKey website.
Important: Only products purchased through official channels are guaranteed to ensure the safety of your assets and qualify for official after-sales service. If you purchase from other channels, we cannot guarantee product quality or support.
How to Prevent Supply Chain Attacks on Hardware Wallets
Before unboxing your imKey Pro for the first time, follow these steps to verify it is an authentic product:
Check the Shipping Origin Ensure the shipping origin matches the official address. For China, the designated shipping location is Hangzhou, Zhejiang Province (specific details are available on the official website).
Inspect the Shipping Box Verify that the shipping box is the official customized packaging (with the imKey logo).
(Example of the medium-sized imKey logo packaging)
Inspect the Product’s Outer Packaging
Confirm that the plastic wrap on the product’s outer packaging is intact.
Ensure that the tamper-proof seals on both sides of the packaging are undamaged. When peeled off, the seals should reveal a pattern of complete letters.
Examine the Device Interface After powering on an unactivated device, the screen should display the following sequence: language selection → device Bluetooth name.
Verify Device Activation During the initial setup with the imToken app, the hardware device will display a prompt indicating “Activation Successful.”
Note: If your imKey Pro fails any of the above checks, it is likely a used product. Using such a device may lead to asset loss. In such cases, contact us via Discord or email support@imkey.im for confirmation.
Important Reminders
When you receive a brand-new device, make sure to personally complete the following steps:
Activate the device: Activation is irreversible and can only be done once per device.
Set and back up your PIN code and binding code.
Create and back up your mnemonic phrase.
Final Thoughts
To quote the Blockchain Dark Forest Handbook, there are two key principles to follow:
Zero Trust: Always maintain skepticism, no matter the situation.
Continuous Verification: To trust, you must have the ability to verify your doubts and make this habit a part of your routine.
If you have any concerns, please reach out to us via Discord or email support@imkey.im. Let’s work together to safeguard your assets.
Important Notice:imKey sells physical security hardware products only and does not provide any virtual asset trading, custody, or funds-related services. References to third-party wallets, exchanges, or decentralized applications are for compatibility purposes only; related functions and services are provided independently by third parties.
Are you facing issues like an inactive TRX account or a low TRX balance for transaction fees?
Don’t worry! imKey’s new Tron account feature allows you to purchase TRX directly with USDT. Whether you need to activate an account or quickly get TRX and energy, this one-step solution makes it easy to resolve insufficient TRX issues.
Tutorial
1. Open the imToken wallet and switch to the Tron account in the imKey wallet. Swipe left on the function bar and tap “TRX” to access the energy.tronify.io page. Next, click “Connect” in the top right corner to connect to imKey.
2. On the page, you can view the current balance, energy, and bandwidth resources of your account. Based on your needs, you can purchase TRX tokens or energy. Select or enter the amount of TRX to purchase, click "Confirm" to view the required USDT amount and confirm. Then, complete the signature on your hardware wallet. After the transaction is confirmed, the TRX tokens will automatically be transferred to your Tron account. Please refresh the balance on the TRX account homepage by pulling down.
Note: The transaction fee is included in the USDT payment, so no additional miner fee is required. You can purchase between 0.8 and 500 TRX, with the actual USDT amount varying based on real-time network changes. Please check the displayed amount on the transfer page.
FAQs
Q1. When will the TRX or energy arrive after payment?
A: After the payment is completed, TRX or energy will arrive within a few minutes. In rare cases, due to broadcasting delays, there may be a 5 to 10-minute delay.
Q2. How long is the energy valid?
A: Energy is valid for 1 hour after it arrives and will be automatically reclaimed upon expiration. Please use it promptly.
Q3. Can I cancel the purchase after it’s completed?
A: Cancellations are currently not supported.
Q4. How do I contact energy.tronify.io’s online support?
A: You can join their Telegram group: http://t.me/tronifyio to contact the admin.
Important Notice:imKey sells physical security hardware products only and does not provide any virtual asset trading, custody, or funds-related services. References to third-party wallets, exchanges, or decentralized applications are for compatibility purposes only; related functions and services are provided independently by third parties.
Summary This article offers a set of security recommendations for using the imKey hardware wallet to help users better protect their digital assets. By following the "Four Do's" and "Four Don'ts" principles, users can enhance their security awareness, avoid common security risks, and ensure the safety of their wallet and assets.
When managing digital assets, security is one of the most critical factors. The imKey hardware wallet is a secure and reliable device that provides users with the tools to protect their digital assets. However, users must still follow some basic security principles during use to prevent potential threats. This article introduces the "Four Do's" and "Four Don'ts" security tips for using the imKey hardware wallet.
Four Do's
Physically Back Up Your Mnemonic Phrase:
Always physically back up and securely store your imKey wallet's mnemonic phrase. It's recommended to use a mnemonic phrase storage box.
Obtain Products and Software from Official Channels:
Understand and apply the principles of zero trust and continuous verification. It is recommended to refer to the "Blockchain Dark Forest Survival Guide" to improve your security awareness.
Charge Regularly:
Charge the device periodically. Charging once a month can extend the device’s lifespan.
Four Don'ts
Don't Randomly Import Mnemonic Phrases:
Avoid importing the mnemonic phrase created by imKey into other hot wallets unless absolutely necessary, and vice versa.
Avoid Unauthorized Operations:
Do not approve authorization requests you don’t understand. Always confirm the recipient address before making a transfer to avoid phishing attacks.
Prevent Device Damage:
Avoid actions that may cause physical damage to imKey, such as hanging it on a keychain. It's recommended to use the accompanying card case to protect the device.
Avoid Using Fast Charging:
Avoid using fast chargers to protect the device’s battery life.
By following these security tips, users can effectively protect their imKey hardware wallet and the safety of their digital assets. The "Four Do's" and "Four Don'ts" principles provide a comprehensive security strategy, helping users mitigate potential risks. If you encounter any issues during use, please contact imKey customer support for assistance.
Important Notice:imKey sells physical security hardware products only and does not provide any virtual asset trading, custody, or funds-related services. References to third-party wallets, exchanges, or decentralized applications are for compatibility purposes only; related functions and services are provided independently by third parties.
Summary This article explains how to connect the Rabby plugin wallet with the imKey hardware wallet via a USB data cable, enabling users to easily manage their imKey hardware wallet on a PC using Rabby. This includes performing transfers and transactions while ensuring the security of offline transaction signing provided by the imKey hardware wallet.
To make digital asset management more convenient, the imKey hardware wallet now supports connection to the Rabby Wallet plugin via a USB data cable. By using Rabby Wallet on a PC, users can easily manage the assets stored on their imKey hardware wallet and perform secure transfers and transactions.
This article will provide a detailed guide on the steps for connecting and managing your wallet, ensuring that users can smoothly utilize this feature.
Before we start, please:
Use imKey paired with imToken, completing the creation of addresses.
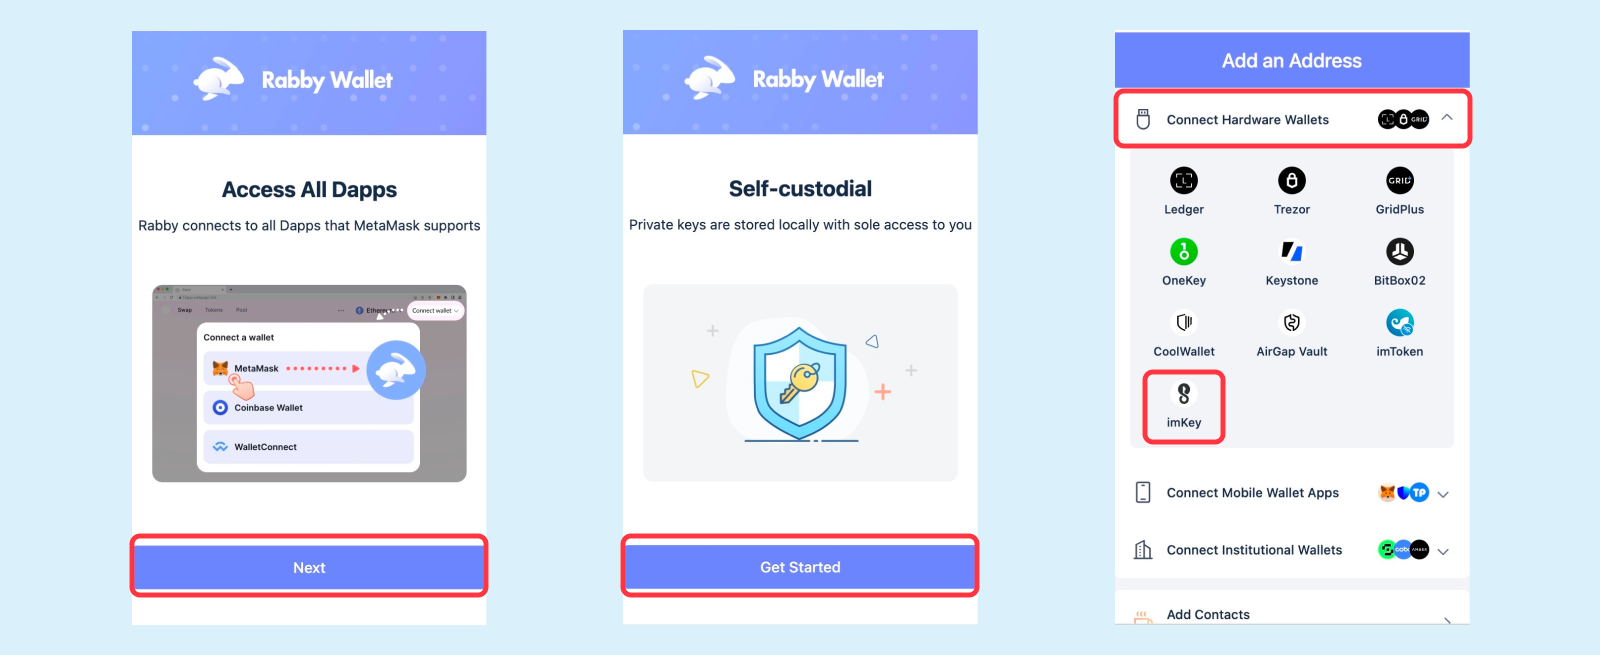
On the Rabby wallet page, click "Next" - "Get Started" - "Connect Hardware Wallets" and select "imKey". Note: If you already have a Rabby wallet, click the add wallet icon in the top right corner of Rabby to enter the "Add an Address" page shown below for connection.
Set the payment password on Rabby and click "Next".
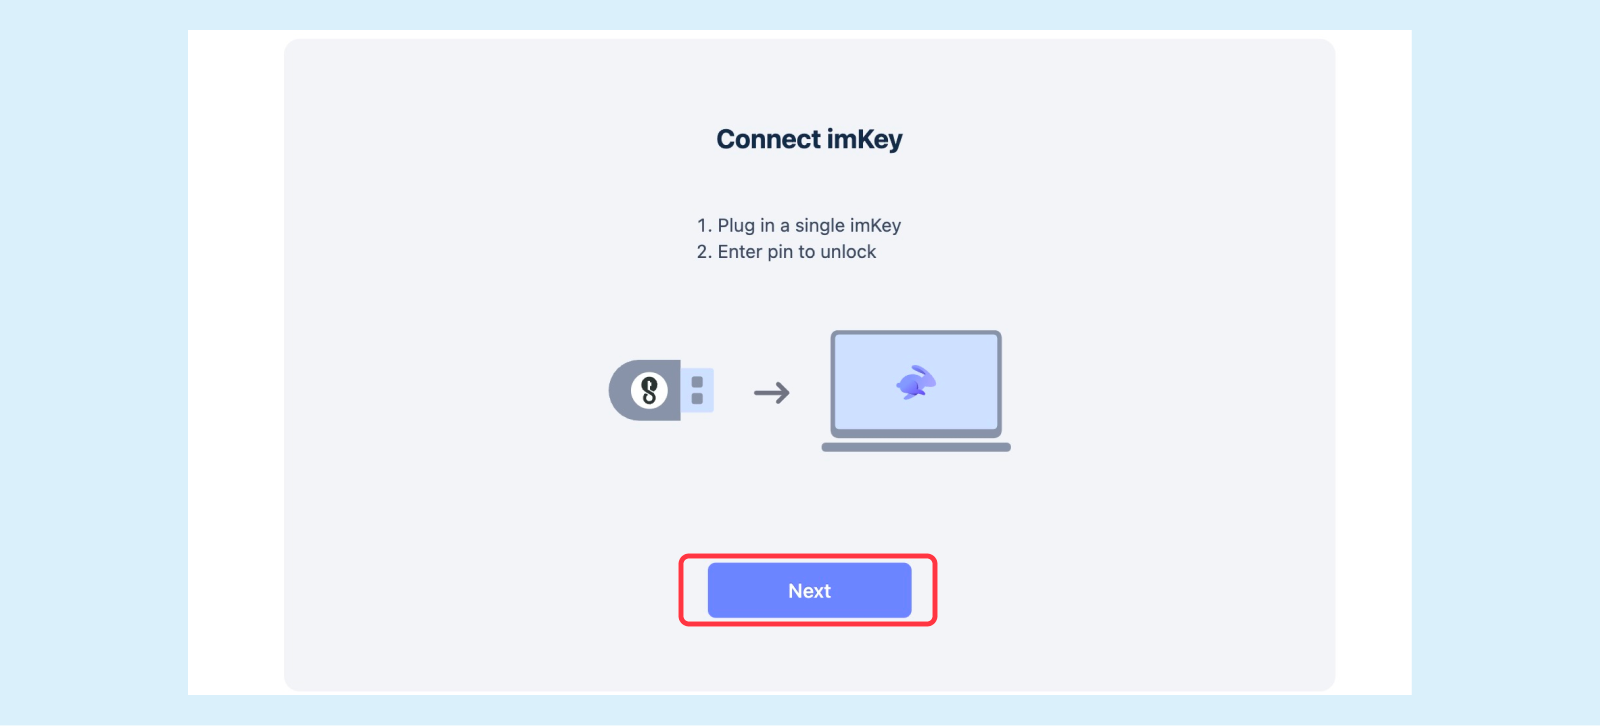
Connect imKey to the computer using a USB data cable and enter the PIN code.
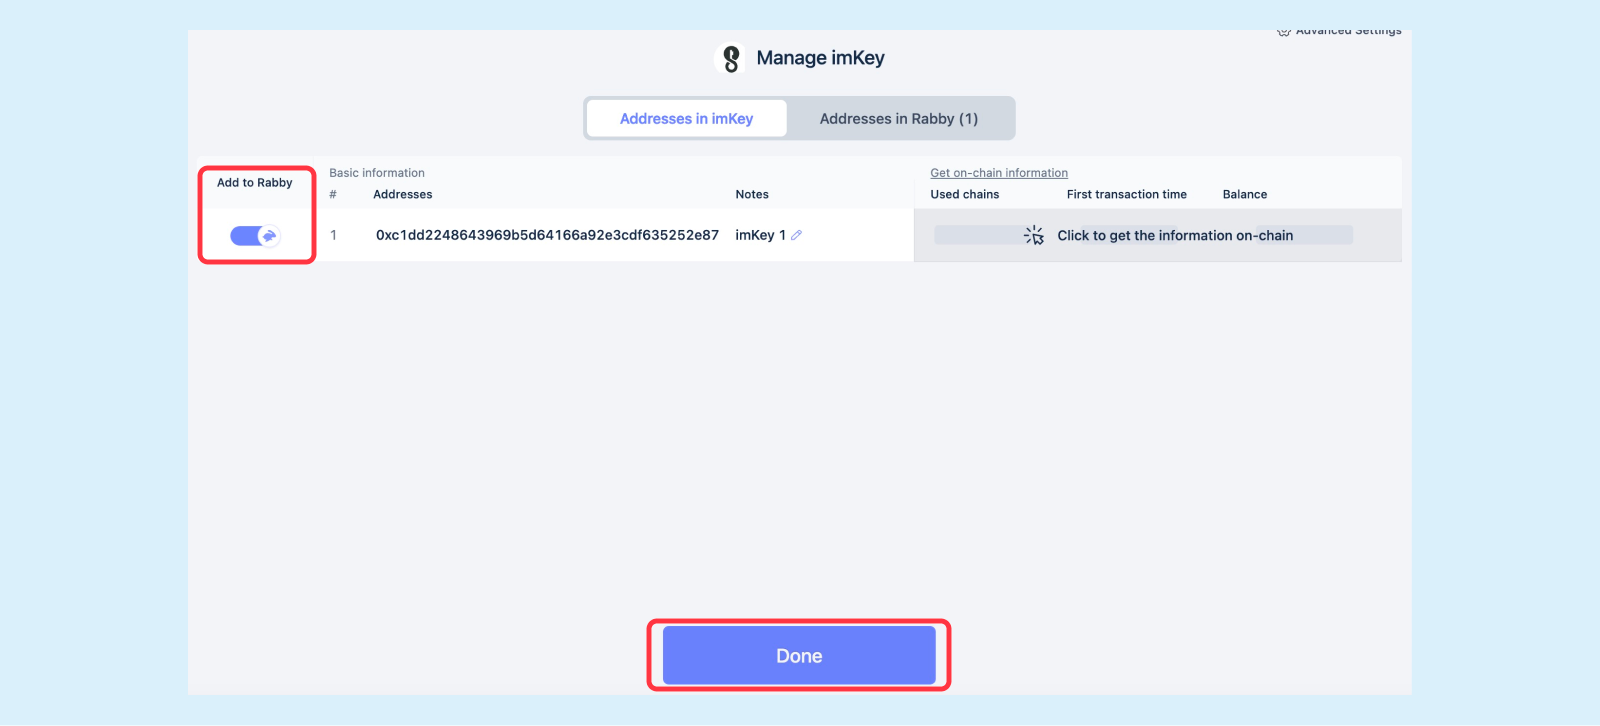
On Rabby, click "Add to Rabby", and then click "Done" to complete the wallet connection.
Once successfully connected, you can use Rabby to view imKey’s assets, transaction history, and initiate transfers on various chains.
By following the detailed steps provided in this article, users can easily connect their imKey hardware wallet to the Rabby Wallet plugin and manage their digital assets on a PC. With Rabby Wallet, users can conveniently view and manage their assets while ensuring the security of every transaction. If you encounter any issues during the process, please contact imKey customer support for assistance.
Important Notice:imKey sells physical security hardware products only and does not provide any virtual asset trading, custody, or funds-related services. References to third-party wallets, exchanges, or decentralized applications are for compatibility purposes only; related functions and services are provided independently by third parties.
If you are reading this guide, you have probably held ETH for some time.
Perhaps you bought ETH when you first discovered Ethereum several years ago. Or perhaps you gradually built your position after experiencing several market cycles. Either way, you have likely started thinking about a question beyond price alone: how should you manage your ETH over the next few years, or even longer?
What deserves your attention is not only the next market move or when the next cycle may arrive. One signature confirmed without proper verification, or one recovery phrase backup that cannot be restored, could affect assets accumulated over many years.
Over the past few years, Ethereum has evolved from an experimental technology into an important network for finance, payments, digital ownership, and open collaboration. ETH is no longer only just a digital asset held passively. Through staking, it can also be used to participate in network operations and earn rewards under protocol rules.
Staking, however, is never as simple as tapping Confirm. Native staking and liquid staking have different requirements, liquidity profiles, and risks. A hardware wallet can reduce the chance of private key exposure, but it cannot replace your own judgment about signatures, protocols, and exit mechanisms.
This guide is designed to help you work through several key questions:
● Why are more ETH holders learning about staking?
● What needs are native staking and liquid staking best suited to?
● How can you build a reliable and recoverable ETH security system?
● How can you find the right balance between security, rewards, and long-term management?
Security is not the opposite of yield. For long-term holders, growth only matters after the assets and the freedom to choose have been protected.
Chapter 1 | Holding ETH Is Only the Beginning
Once you decide to hold ETH for the long term, the questions worth considering go beyond when to buy or how high the price may rise.
When your time horizon extends from months to years, the outcome is shaped not only by market volatility, but also by how you manage your assets: which wallet you use, how you store your recovery phrase, how you verify signatures, and whether you participate in ETH staking.
Holding ETH does not mean putting it in a wallet and never thinking about it again. Over the coming years, you may face a series of practical questions:
● Is the wallet I created and use suitable for long-term ETH storage?
● If my phone or hardware wallet is damaged, can I restore the original account successfully?
● Which fits my needs better: native staking or liquid staking?
● How should I balance asset security, liquidity, and staking rewards?
These questions may not arise all at once today, but they may appear one by one during a long holding period.
In the past, ETH was often viewed primarily as a digital asset to hold over time. As the Ethereum network has developed, ETH has also become a way to participate in this open network. By staking, you can take part in network operations through a validator or staking protocol and earn rewards under the applicable rules.
This also means that the questions long-term holders face are changing.
The question is no longer only, "Should I hold ETH?" It is also, "How should I manage my ETH securely?"
Market volatility is difficult for any individual to control. But you can learn and prepare in advance for how your wallet is created, how your recovery phrase is backed up, whether each signature is verified, and which staking method you choose.
Holding ETH is only the beginning. The next questions are why more long-term holders are paying attention to ETH staking, what it can offer, and what risks it involves.
Chapter 2 | Why Consider ETH Staking?
If holding ETH reflects confidence in Ethereum's long-term value, staking is another way to participate in the network while continuing to hold ETH.
Before discussing staking rewards, however, there is a more fundamental question to answer: why Ethereum?
Ethereum Continues to Evolve
Over the past few years, Ethereum has evolved from an experimental blockchain technology into an open network supporting stablecoins, decentralized finance, digital ownership, digital identity, and public collaboration.
It does not depend on any single institution to keep running. Anyone can verify the network state, deploy applications, or transfer assets. Because Ethereum is open, verifiable, and not controlled by a single operator, it is increasingly becoming a credibly neutral infrastructure for settlement and coordination.
New applications are still emerging. Some projects, for example, are exploring how Ethereum can support onchain payments, identity, reputation, and verifiable collaboration for AI agents. These efforts show that Ethereum's application boundaries are still expanding.
For long-term holders, interest in ETH staking begins with a view on whether the network can continue to develop. Only if you recognize Ethereum's long-term value does it make sense to discuss how to participate in the network and earn staking rewards.
Staking Is a Native Ethereum Mechanism
Ethereum currently uses Proof of Stake to maintain network consensus.
Validators deposit ETH into the Ethereum staking deposit contract and take on responsibilities such as validating blocks, submitting attestations, and proposing blocks. When they perform these duties correctly, validators earn rewards under protocol rules. If they remain offline for extended periods, fail to perform their duties, or violate consensus rules, they may lose rewards or even incur slashing penalties.
In other words, staking rewards are not created by a platform out of thin air. They are incentives provided by the Ethereum protocol for validators that help operate the network.
However, a "native mechanism" does not mean "risk-free." Depending on how you participate, staking may still involve node operations, service providers, smart contracts, liquidity, exit queues, and signing operations. To understand staking, you need to know both where the rewards come from and who bears each risk.
● Staked ETH represented approximately 33.25% of the supply;
● The network had approximately 880,547 active validators;
● The reference APR displayed on the page was approximately 2.65%.
These figures change as network conditions change, but they show that ETH staking has become an important and widely adopted form of participation in the Ethereum network.
This does not mean every ETH holder should begin staking immediately. Choosing not to stake can preserve greater liquidity and reduce the number of protocols and operational risks you need to manage. Choosing to stake can provide an opportunity to earn protocol rewards, but it also means accepting the applicable lockup, exit, and operational rules.
The real comparison is not whether "staking" or "doing nothing" is universally correct. It is which arrangement better fits your holding plan.
How Time Affects Staking Rewards
For long-term holders, staking rewards are not only about the reference annual rate in a given year. They also depend on whether rewards continue to participate in staking. In validator modes or staking mechanisms that support compounding, some rewards can be added to the effective balance under the applicable rules, creating a compounding effect. Automatic withdrawal validators work differently: rewards become withdrawable under protocol rules and are not automatically added to the current validator.
Using an initial stake of 32 ETH, and assuming the annual rate remains unchanged and all rewards are continuously restaked, the theoretical results are as follows:
Assumed Annual Rate
After 1 Year
After 5 Years
After 10 Years
2%
32.64 ETH
35.33 ETH
39.01 ETH
3%
32.96 ETH
37.10 ETH
43.01 ETH
4%
33.28 ETH
38.93 ETH
47.37 ETH
Staking allows long-term holders to participate in the Ethereum network and earn protocol rewards. Whether it is suitable for you depends on how well you understand how it works and how you view liquidity, risk, and time.
Before you begin staking, it is more important to understand who controls the assets, where the rewards come from, how to exit, and what each signature actually means than to compare differences of a few tenths of a percentage point between platforms.
Chapter 3 | Understand Before You Act
An ETH staking transaction may take only a few minutes.
Connecting a wallet, selecting a method, confirming an amount, and signing may look simple. Yet those few clicks can involve long-term asset arrangements, different exit rules, and ongoing reliance on wallets, protocols, and service providers.
Before comparing which method is easier to use or which page displays a higher annual rate, pause and ask yourself a few questions:
● After I stake, who can control and recover my ETH?
● Is the difference between native staking and liquid staking only the minimum amount required?
● Do the displayed rewards come from the Ethereum protocol, or from other products and strategies?
● If I need to exit, how long might I have to wait?
● If my phone, hardware wallet, or service page becomes unavailable, how can I recover and continue managing my assets?
● What onchain action will the signature I am being asked to confirm actually execute?
These questions do not make staking more complicated. Instead, they help make the information hidden behind the buttons more visible.
Viewing the Market: Accept Change Instead of Trying to Predict Everything
The price of ETH changes, and reference staking rates change as well. Long-term holding does not mean ignoring the market. It means accepting that some changes cannot be predicted in advance and avoiding decisions driven by a single short-term move or a temporarily higher annual rate.
What matters is whether your current choice would still fit your liquidity needs and risk tolerance if prices and rewards changed.
Managing Assets: Know What Actually Needs Protection
The ETH in your wallet is not controlled by an account name or the physical shell of a device. Control ultimately depends on the private key, the recovery phrase, and the withdrawal address associated with staking.
Different staking methods have different control structures.
In non-custodial native staking, users typically control the withdrawal address, while a node service provider may use the validator signing key for routine operations. In liquid staking, users hold tokens representing their staking position and rely on the relevant protocol's smart contracts and redemption mechanism.
For this reason, you cannot determine whether you still control your assets simply by seeing the word "non-custodial." You also need to understand:
● Who holds the recovery phrase and controls the withdrawal address?
● Who operates the node?
● What can the service provider do, and what can it not do?
● If the service stops operating, can I still restore my wallet and recover my assets?
A hardware wallet can reduce private key exposure to connected environments, but the device itself is not a backup. Even if the device is damaged, the wallet can usually be restored on a compatible device as long as the recovery phrase remains secure, complete, and recoverable. If the recovery phrase is exposed, keeping the hardware wallet safe cannot prevent someone else from controlling the assets.
Signing: Do Not Let "Confirm" Become a Habit
Staking requires interaction with wallets, websites, or smart contracts. The Confirm button may look simple, but different signatures can produce completely different onchain outcomes.
Before signing, verify the source of the page whenever possible, and check the visible network, amount, address, and transaction type on the signing device. This is the meaning of "what you see is what you sign": do not rely only on what a phone or webpage says will happen. Confirm what the hardware wallet screen is actually asking you to sign.
If the information shown on the device does not match your expectations, or you do not understand the purpose of the signature, the safest response is not to finish the process quickly. Stop and verify the details again.
Understanding cannot eliminate every risk, but it helps you know what you are choosing and reduces avoidable mistakes.
Once these questions are clear, you can compare rewards, fees, and user experience across different options. Among all these factors, however, the first boundary to define is still the security of your assets.
Chapter 4 | Security Before Yield
The annual rate is usually the most visible figure on a staking page.
One option may display 2.7% and another 3.2%, making the difference look clear and direct. But the annual rate is only part of the picture. What determines whether a choice is sustainable over time is the risk required to earn the rewards and whether the assets remain controllable if something goes wrong.
Consider two approaches. One offers a higher reference annual rate but requires converting ETH into a staking token and then depositing it into another DeFi protocol. This may improve capital efficiency, but it also adds smart contract, liquidation, liquidity, and price-deviation risks.
Another approach earns rewards mainly from the Ethereum protocol, with the withdrawal address controlled by the user. However, the validator must be kept running by the user or a node service provider, and exits must follow the network queue. This reduces some smart contract dependencies, but it still involves risks such as validator downtime, slashing, service provider reliance, and exit delays.
You cannot determine which option is safer by looking only at labels such as annual rate or liquidity. What matters more is understanding the exact structure of each option.
Before choosing, work through these five questions:
1. Who controls the assets: who holds the recovery phrase, controls the withdrawal address, and holds the staking token?
2. What must be signed: does the process involve unfamiliar contract approvals or multiple transactions?
3. Which third parties are involved: who operates the nodes, front end, and smart contracts?
4. How do I exit: is there a queue, and could redemption or trading involve slippage or price deviation?
5. How are rewards calculated: does the page show APR or APY, and have service fees and other costs already been deducted?
A hardware wallet can reduce the risk of private key exposure in connected environments and provide an independent screen for verifying signatures. But it cannot determine whether a protocol is reliable or eliminates node, smart contract, liquidity, or market risks.
"Security before yield" does not mean rejecting rewards. It means confirming that the risks are clear, the assets are recoverable, and the worst-case outcome is acceptable before comparing returns.
A difference in annual rates takes time to accumulate. One unverified signature can change control of the assets immediately.
Security Before Yield. For long-term holders, yield matters, but it should never come before control of the assets and clearly defined security boundaries.
Chapter 5 | Choosing the Right ETH Staking Method
There is no single staking solution that suits everyone.
Some people prioritize control of their assets and are willing to accept a higher entry threshold and exit delays. Others value liquidity, want to participate with a smaller amount, and want to keep the option of using their assets elsewhere. The key question is not whether native staking or liquid staking is "more advanced," but which better fits your capital, liquidity needs, and risk tolerance.
How do native staking and liquid staking differ?
Comparison
Native Staking
Liquid Staking
Minimum Amount
Higher (32 ETH or more for one validator)
Very low (any small amount of ETH can participate)
Asset Control
Full control of withdrawal credentials, for example through signatures with an imKey hardware wallet
Tokenized position, such as stETH, with partial reliance on third-party smart contract security
Liquidity
Locked in Ethereum staking; exits follow network rules and queues
High; staking tokens can be exchanged for ETH on the secondary market
Capital Efficiency
Focused on securing the base network; the staked ETH cannot be reused in DeFi while locked
Higher; staking tokens can be used in lending, market making, and other onchain applications
Best Suited For
Users who prioritize security and do not need short-term liquidity
Users who prioritize capital flexibility and layered onchain strategies
When to Learn More About Native Staking
If you hold 32 ETH or more, want to participate in the Ethereum network as a validator, and are willing to accept the applicable exit rules, native staking may be worth exploring.
Its rewards and penalties are defined by the Ethereum protocol. With non-custodial services, users typically manage their own withdrawal address and wallet recovery phrase, while a node service provider handles routine validator operations.
This division of responsibilities lowers the barrier to running your own server, but it does not eliminate third-party risk. Before participating, understand:
● Who operates and maintains the validator;
● What happens if the validator goes offline or is slashed;
● Who controls the withdrawal address;
● How service fees are calculated and paid;
● What steps are required to exit the validator.
On imToken's current non-custodial ETH staking page, for example, users may see two validator modes:
●Compounding validator: rewards may continue to be added to the effective balance under protocol rules. A single validator currently supports 32-1,920 ETH, the amount must be a whole number, and only one validator can be created per transaction.
●Automatic withdrawal validator: rewards become withdrawable under protocol rules. One validator is created for every 32 ETH. A single transaction currently supports 32-3,200 ETH, and the amount must be a multiple of 32 ETH.
Native Staking Workflow: imToken Staking Service Example
When to Learn More About Liquid Staking
If you hold less than 32 ETH or want to retain greater liquidity, liquid staking may be worth exploring.
After participating, users typically receive a token representing the staking position. For example, staking ETH through Lido provides stETH. Holders can continue to store or transfer these tokens, request redemption under protocol rules, or exchange them for other assets on the secondary market.
This lowers the entry threshold and makes staking positions easier to transfer. However, "tradable" does not mean "immediately redeemable for ETH at a guaranteed 1:1 rate." Outcomes may be affected by protocol exit times, market liquidity, slippage, and price deviation.
Using staking tokens in lending, market making, or other DeFi applications adds the smart contract and liquidation risks of those protocols. Greater capital efficiency also makes the risk structure more complex.
Liquid Staking Workflow: Lido Example
What imKey Provides After You Choose
Whether you choose native staking or liquid staking, you need a wallet to initiate transactions and complete signatures. This is where imKey helps protect the wallet's private key.
When you use imToken to participate in supported non-custodial native staking or Lido liquid staking, imKey stores the wallet private key offline and completes the relevant signatures inside the device. You can verify the visible transaction details on the hardware wallet screen before deciding whether to confirm.
It is important to understand the following boundaries:
● imKey is a hardware wallet, not an Ethereum validator or node operator;
● imToken provides wallet interaction, staking access, and management pages;
● Validators used for native staking are operated and maintained by the relevant service providers;
● Protocols such as Lido independently provide liquid staking contracts and redemption mechanisms.
A hardware wallet can reduce private key exposure in connected environments, but it cannot determine whether a protocol is reliable or eliminate node, smart contract, liquidity, or market risks.
Choosing a staking method and choosing how to protect your private key are related decisions, but they are not the same decision.
First choose a staking method that fits your needs, then protect control of the assets with an appropriate wallet and backup plan.
Related Articles
● How to Participate in Non-Custodial ETH Staking with imKey
● How to Stake ETH with Lido Using imKey
Chapter 6 | Building Your ETH Security Framework with imKey
Completing a staking transaction is not the end of asset management.
Over the coming years, you may replace your phone, upgrade your wallet, encounter hardware wallet damage, or see changes to service pages and staking rules. Long-term asset protection does not depend on a single device. It depends on a security framework that covers private keys, signatures, backups, and recovery.
imKey's role in this framework is to keep your wallet private key offline and provide an independent confirmation point for every signature.
Layer 1: Keep the Private Key Offline
imKey generates and stores the private key inside a secure chip, and transaction signatures are completed inside the device. The phone or wallet application constructs and broadcasts the transaction but does not directly access the private key. This structure reduces the chance of private key exposure on an internet-connected phone or computer.
Layer 2: Verify Every Signature on the Device
A hardware wallet does more than store the private key. It also provides an independent checkpoint before signing.
In imToken's current non-custodial ETH staking process, creating a new stake usually requires two signatures. The first sends the prepaid service fee transaction, and the second submits the staking request. Before each signature, verify the network, amount, address, and transaction type against what is actually shown on the imKey screen. If the device displays information you did not expect, or you do not understand the purpose of the signature, stop the process first.
The point of "what you see is what you sign" is not to make signing faster. It is to ensure that confirmation takes place on the device that holds the private key.
Layer 3: Prepare for Device Damage with a Backup
A hardware wallet can be damaged or lost, so the device itself cannot replace a recovery phrase backup. The recovery phrase is an essential credential for restoring the wallet, and anyone who obtains it may be able to control the corresponding assets. It should always be stored offline: do not photograph it, take screenshots, upload it to the cloud, or store it in plain text on a connected device. A reliable backup plan should meet all three requirements:
● It should not be easy for someone else to obtain;
● It should remain recoverable if the device is damaged;
● It should not be permanently lost because one location or one storage medium is damaged.
If you need to test the recovery process, do so only after fully understanding the steps, in a controlled environment, and confirm that the restored wallet address matches the original address.
A reliable security plan does not guarantee that a device will never fail. It ensures that you still know how to recover control of the assets after a failure.
Layer 4: Understand the Boundary Between imKey and Staking Services
Using imKey for staking usually involves several different parties:
●imToken provides wallet interaction, staking access, and management pages;
●Node service providers operate and maintain validators used for non-custodial native staking;
●Protocols such as Lido independently provide liquid staking contracts and redemption mechanisms;
●imKey stores wallet private keys offline and completes signatures inside the device.
imKey does not operate Ethereum validators or provide staking rewards. It can help reduce private key exposure and accidental signing, but it cannot eliminate validator downtime, slashing, smart contract, liquidity, or market risks.
A complete ETH security framework therefore requires more than simply "using a hardware wallet." It also requires you to:
Keep the private key offline, verify every signature carefully, maintain a recoverable recovery phrase backup, and continue learning about staking rules.
Devices and products will continue to evolve, but these four foundations are unlikely to change. Together, they determine whether you can maintain control of your assets and your choices over the long term.
Chapter 7 | Five Principles for Long-Term Holders
Markets change, and staking methods and wallet products continue to evolve. Some principles, however, do not lose their value because of one market cycle or product upgrade. They cannot eliminate every risk, but they can help you maintain a consistent standard of judgment when facing new tools, new protocols, and higher yields.
1. Always Know Who Controls the Assets
Understand who manages the private key, recovery phrase, withdrawal address, and validator signing key.
A non-custodial solution does not mean there are no third parties involved. A user may control the withdrawal address while a service provider still operates the node. A user may hold the staking token while the underlying assets still depend on protocol contracts.
What matters is knowing what each party can do and ensuring that you hold the credentials required for recovery.
2. Put Security Before Yield
Reference annual rates are easy to compare, while risks are often hidden in protocols, approvals, nodes, and exit rules.
When an option offers higher rewards, first identify where the additional rewards come from and which dependencies they add. Security before yield does not mean rejecting growth. It means not taking risks you cannot understand or tolerate for a limited difference in returns.
3. Put Principal Before Growth
Staking rewards take time to accumulate, while an incorrect signature, an exposed recovery phrase, or a high-risk contract can affect the principal immediately.
Before considering compounding and long-term growth, confirm that the wallet can be restored, signatures can be verified, and the exit path is understood. Growth only matters if the principal and control of the assets still exist.
4. Reduce Single Points of Failure Through Diversification
Devices can fail, backup media can degrade, and storage locations can be affected by unexpected events.
Depending on your circumstances, you can distribute devices, backup media, and storage locations appropriately. Diversification, however, does not simply mean creating more copies of the recovery phrase. More copies may also create more points of exposure.
A sound diversification plan considers both sides: one failure should not make recovery impossible, and excessive backups should not create unnecessary exposure risk.
5. Long Term Does Not Mean Unchanging
Long-term holding does not mean setting up a wallet once, completing one staking transaction, and never checking again.
Protocol rules, service fees, validator modes, and product entry points may all change. A more sustainable long-term management approach is to review official announcements regularly, verify staking records, check the condition of devices and backups, and reassess earlier choices when necessary.
What deserves long-term commitment is not one fixed product or one staking method, but a set of security habits that can evolve as the environment changes.
These five principles apply throughout the process of holding, backing up, signing, staking, and exiting ETH positions.
Chapter 8 | Complete a Self-Check Before You Stake
Before you actually tap Stake, take two minutes to complete this self-check.
This is not a test, there are no standard answers, and your score will not determine whether you are "suited to staking." It is simply a way to confirm which questions you have already answered and which areas require more research.
① Do I Understand the Method I Chose?
□ I understand the difference between native staking and liquid staking
□ I know how my chosen staking method works
□ I understand the exit mechanism and the possible waiting time
② Am I Prepared to Sign?
□ I use a trusted wallet to manage ETH
□ I keep control of my private key or recovery phrase at all times
□ I do not confirm signatures when I do not understand the content
③ Is My Backup Ready?
□ I have completed an offline backup of my recovery phrase
□ I have verified that the backup can restore the wallet
□ My backup plan avoids a single point of loss
④ Am I Prepared for Long-Term Management?
□ I have selected a staking method that fits my needs
□ I am willing to continue monitoring official announcements and other important information after staking
□ I understand that staking is a form of long-term asset management, not simply a way to earn rewards
Completing an item does not mean the related risk has disappeared. It means you have actively verified an important issue.
How to Interpret Your Results
0-4 Items Completed
Pause before proceeding and learn the basics of wallets, recovery phrases, signatures, and ETH staking. In particular, never sign a transaction you do not understand.
5-8 Items Completed
You understand some key information, but several areas still require confirmation. Prioritize the withdrawal address, exit mechanism, service fees, backup recovery, and the boundaries of third-party services.
9-12 Items Completed
You have verified most of the fundamentals. Before proceeding, confirm again that the current option fits your asset plan, liquidity needs, and risk tolerance.
Completing the checklist does not mean staking is risk-free, and it does not mean you must participate. More important than the number of boxes checked is identifying the questions you still cannot answer clearly.
A self-check cannot make the decision for you, but it can keep that decision from being based on unclear information and rushed signatures.
You are truly prepared to begin only when you understand the staking method, see the control boundaries clearly, verify every signature, and confirm that the wallet can be restored.
Closing Thoughts
If you plan to hold ETH for the long term, the outcome is often shaped not by one decision that appears important, but by many ordinary and specific choices.
A complete and recoverable recovery phrase backup, a decision to pause before signing an unfamiliar transaction, or a staking method selected according to your own needs may matter more than a short-term difference in annual rates.
Ethereum continues to develop, and staking protocols, validator modes, and wallet products will continue to change. An option that suits you today may need to be reassessed in the future, and a familiar entry point may change after the next upgrade.
Long-term holding therefore does not mean making one decision and never changing it. It is an ongoing management process: learning new rules, checking existing backups, verifying every signature, and preparing in advance for device failure, service changes, and exit needs.
Long-term thinking does not mean remaining permanently optimistic about the market. It means staying clear-headed about every specific action in a changing environment.
imKey can help keep your private key offline and complete signatures on an independent device. Complete security, however, still requires you to protect your recovery phrase, understand the staking method, and recognize the boundaries of responsibility between protocols and service providers.
Security is not the opposite of yield, nor is it a promise that can remove risk. It is a set of repeatable habits that helps you retain control of your assets and your decisions when new opportunities and choices arise.
May this guide help you make fewer rushed confirmations and more informed decisions; verify every signature and ensure every backup can truly restore your wallet when needed.
Contact Us
For business partnerships, product inquiries, or technical support, contact us through the following channels.
When participating in non-custodial staking in imToken, one key advantage of a Compounding Validator is flexibility.
If you want to keep the validator running (and continue earning rewards) while withdrawing the portion of assets exceeding 32 ETH back to your wallet, you can use the partial withdrawal feature.
Guide
Open your ETH wallet and tap Stake to enter the imToken stake management page.
Tap Withdraw, then select the target validator from the list.
Check the withdrawable amount, and enter the amount you want to withdraw (or tap Max). Note: Only the amount exceeding 32 ETH can be withdrawn. If you want to exit completely, refer to How to Withdraw Your Staked ETH?.
Tap Confirm and wait for the withdrawal order to be created (about 5 seconds). Then follow the prompt to sign and send the withdrawal transaction.
The status will be displayed as Confirming. Wait for the Ethereum network to process the request. Once completed, the withdrawn ETH will be automatically transferred to your wallet address.
Notes
To maintain the stability of the Ethereum network, there is a limit on the number of validators that can exit each day. During periods of high market volatility, the exit queue may take longer. This is a protocol-level constraint. Tap here to view the Ethereum validator queue.
Whether it is a partial withdrawal or a full exit, funds will be transferred directly to your wallet after processing. No manual claim is required.
Currently, only one validator can be exited per request. Batch exit is not supported.
If you have already created a Compounding Validator in imToken and it is in the Active state, you can add more ETH at any time to increase your staking amount.
The maximum balance for a Compounding Validator is 1,920 ETH. After adding tokens, the newly deposited ETH will be staked together with the existing balance and earn rewards through automatic compounding.
Guide
1. On the ETH wallet homepage in imToken, tap Stake to enter the imToken stake interface. Then select Native Staking.
2. On the staking management page, tap Topup to enter the validator list.
3. Select the validator you want to add stake to.
4. Enter the additional staking amount, review the service fee, then tap Confirm and wait for the order to be generated.
5. Follow the prompts to complete the two transactions:
Tap Sign to submit the prepaid service fee transaction.
Select Continue sending, tap Next, then tap Sign again to submit the staking request transaction.
6. When the status is no longer displayed as confirming, the additional stake is confirmed. The new funds will start earning rewards (the waiting time depends on the Ethereum validator queue).
Asset Management and Exit
The non-custodial staking model gives users full control over their assets. You can add stake, withdraw partially, or exit completely at any time.
Please refer to the following guides based on your needs:
Plan to exit staking and withdraw the principal? How to Withdraw Your Staked ETH?— applies to users who want to stop the validator and withdraw all ETH principal and accumulated rewards.
You can participate in non-custodial ETH staking through the imToken staking page using your imKey hardware wallet. The non-custodial staking solution reduces the operational burden of running a validator node while preserving as much user control over staked assets as possible. You do not need to run or maintain validator nodes yourself, but you are still responsible for keeping the recovery phrase of your imKey ETH account secure, reviewing each signing request carefully, and confirming the withdrawal address.
If you hold 32 ETH or more, you can create a non-custodial ETH validator through the imToken staking page. The page may offer different validator modes, such as auto-compounding validators and auto-withdrawal validators. Supported options and rules are subject to what is displayed on the product page.
1. Step-by-step guide to non-custodial ETH staking
Step 1: Go to the staking page
Open imToken and tap the icon in the upper-left corner to enter the “Select Account” page. Choose the ETH account under your imKey hardware wallet.
On the ETH wallet homepage in imToken, tap “Stake” in the function bar to open the imToken staking page, then tap “Confirm” to authorize the wallet connection.
Select “Native Staking”, tap the circular three-dot menu in the upper-right corner, and then tap “Stake”.
Step 2: Choose a staking mode
The page provides two staking reward modes: “Auto-compounding” and “Auto-withdrawal”. You can tap “Switch” to view different modes and compare the required staking amount, fees, reward distribution method, and other details before choosing the option that best suits your needs.
Learn more: Notice on the Update to the Fee Model for Non-custodial ETH Staking
Model
Amount
Features
Compounding
32–1,920 ETH
No 32 ETH multiple required. One validator per request. Supports adding stake. Rewards are auto-compounded.
Auto-withdrawal
32–3,200 ETH
Requires multiples of 32 ETH. 1 validator per 32 ETH (up to 100 per request). Rewards are automatically withdrawn to your wallet.
Step 3: Submit your staking request
Generate an order
In Auto-Compounding mode, enter the staking amount, review the service fee, and tap “Confirm”.
In Auto-Withdrawal mode, the default amount is 32 ETH, which creates one validator. You can tap “+” to increase the staking amount in multiples of 32 ETH.
Note: After tapping “Confirm”, the system will generate the staking order (approximately 5–20 seconds). During this process, validator resources are being prepared. Please stay on the current page and do not close the app or switch pages.
Review the fee details
Review the prepaid service fee and staking amount, then tap “Confirm”.
Sign and send the transactions
This process includes two or three transactions. Please complete the following steps in order.
First, the page will initiate a signing request. Carefully check the information displayed on your phone and on your imKey device. After confirming that everything is correct, tap “Request confirmation from imKey” and complete the signature on your imKey hardware wallet to send the prepaid service fee transaction.
Then follow the page instructions and tap “Request imKey Confirmation” again. Next, carefully check the payment details, receiving address, and network fee (Gas fee) on your imKey hardware wallet. After confirming everything is correct, complete the second signature to initiate the on-chain staking transaction.
Both service fees and staking transactions require gas fees, depending on real-time network conditions.
Note: If you have already participated in staking and the system prompts you to pay historical service fees, please follow the page instructions and complete the three signing steps for the historical service fee, prepaid service fee, and staking transaction.
Check the result
You can view the status of your staking request on the current staking management page. When the status no longer shows “Processing”, it means the staking request has been successfully confirmed.
Compounding👆
Step 4: Validator Activation and Management
After the request is confirmed, you can go to the validator management page and tap Validator to view the real-time status:
Deposited The validator has been successfully created and is waiting for confirmation on the Ethereum consensus layer (usually 12–18 hours).
Pending The validator has been confirmed by the consensus layer and entered the activation queue. The waiting time depends on the overall network queue. Tap here to view the Ethereum validator queue.
Active The validator starts running and generating rewards. You can view details such as runtime and total rewards on the validator details page.
2. Asset Management and Exit Guide
The non-custodial staking model gives users full control over their assets. You can initiate additional staking, partial withdrawal, or full exit at any time.
Please refer to the following guides based on your needs:
Want to increase the staking amount? How to Add Stake to a Compounding Validator?— suitable for users who want to increase their staking base and enable continuous compounding.
Plan to exit staking and withdraw the principal? How to Withdraw Your Staked ETH?— applies to users who want to stop the validator and withdraw all ETH principal and accumulated rewards.
Rewards
ETH staking rewards consist of two parts:
Staking rewards Earned when the validator completes block validation and block proposal on the Ethereum consensus layer.
Block rewards When a validator is selected to propose a block, it can receive all transaction fees in that block. Additional income may also be earned through block auction markets.
Security reminders
Before participating in non-custodial ETH staking, always access the staking page through the imToken App, the official imKey website, or another trusted entry point. Do not open staking pages through unknown links, private messages in communities, search ads, or QR codes, as they may lead to phishing websites or fake staking pages.
The recovery phrase of your imKey ETH account directly controls your staked principal and accumulated rewards. Please back it up securely. If your recovery phrase is lost, you may not be able to recover your staked ETH principal or rewards. If it is leaked, your assets may be transferred by someone else.
Stop immediately if any website, customer support agent, or so-called official representative asks you to enter your recovery phrase or private key, or asks you to transfer funds first to verify your account, pay a deposit, or unlock rewards. These are usually scams.
Remember: your recovery phrase and private key equal full control over your wallet assets. No one should ever ask you for them.
The validator infrastructure for imToken’s non-custodial ETH staking service is currently operated and maintained by InfStones, a professional infrastructure provider partnered with imToken.
Since the launch of the Beacon Chain, InfStones has provided Ethereum staking services and validator node services to its institutional clients and is the infrastructure provider for Binance's Ethereum staking. To date, there have been zero security incidents, a 100% online rate, and staking yields 0.5% to 1% higher than the average yield across the network.
InfStones has operated thousands of nodes on over 50 public chains, accumulating extensive experience in node operation management. They have also independently developed a universal blockchain infrastructure platform, providing reliable support for the stable operation of nodes.
imToken will further expand the diversity of validator service providers in non-custodial ETH staking services and consider introducing DVT (Distributed Validator Technology) into the validator technology stack to further enhance the security of validator operation and maintenance.
This article addresses common security issues encountered when using decentralized wallets, including improper backup of mnemonic phrases, accidentally granting transaction permissions to malicious contracts, falling victim to scams, and hacker attacks. For each issue, the article provides detailed countermeasures to help users better protect their digital assets.
As cryptocurrency becomes more widespread, decentralized wallets are increasingly popular due to their high level of autonomy and security. However, using decentralized wallets also comes with certain security risks. This article will detail these common issues and provide corresponding strategies to help users better manage and protect their digital tokens.
1. Failure to Properly Back Up Mnemonic Phrases
Decentralized wallets do not store users' mnemonic phrases, and once lost, they cannot be recovered. Statistics show that one of the most common reasons for token loss is users failing to properly back up their wallet's mnemonic phrases. If a mnemonic phrase is lost or improperly stored, the tokens in the wallet may be permanently lost. Additionally, if the mnemonic phrase is not securely stored, the tokens can easily be accessed by others.
Countermeasures:
Before using the wallet, ensure the correctness of the mnemonic phrase and back it up properly.
Use physical media to back up the mnemonic phrase, such as writing it down on paper or using a mnemonic phrase storage box, to ensure its security.
Ensure secure storage throughout the entire process, and consider necessary disaster recovery to avoid the risks of single-point backup failure.
2. Accidental Authorization of Transfer Permissions to Malicious Contracts
Authorization operations typically occur during interactions with DApps. Be cautious when granting permissions, as if the authorization is given to a malicious contract, the tokens in your wallet may be transferred without your confirmation. The DApp ecosystem is mixed, and careless authorization could lead to asset loss. The only way to avoid such risks is by increasing your security awareness.
Countermeasures:
Review Contract Source Code: Seek professional auditors to review the contract code to ensure its security.
Use Trusted Contracts: Prefer reputable and trusted contracts.
Regularly Check Wallet Authorizations: If you notice your wallet has authorized unknown contracts, revoke the authorization as soon as possible. Recommended site for checking and revoking authorizations:https://revoke.cash/zh.
Be Cautious with Transfer Permissions: Do not easily authorize transfer permissions, and remain vigilant after authorization, ready to revoke permissions if necessary.
3. Falling Victim to Scams
Scammers employ a variety of tactics, and users who are not highly alert may inadvertently give away their mnemonic phrases or transfer permissions, leading to token theft.
Countermeasures:
Protect Your Mnemonic Phrases/Private Keys: Any request for your mnemonic phrases/private keys via SMS/phone scams is untrustworthy.
Avoid Clicking Unknown Links or Downloading Unknown Software: These could be phishing sites disguised by hackers.
Ensure Website Security: Use reputable websites and ensure that the site's security certificate is valid.
Regularly Monitor Accounts: Regularly check your wallet accounts to ensure their security.
Consult Professionals: If you encounter a scam, consult professional institutions or the police.
4. Being Hacked
On the blockchain, mnemonic phrases represent ownership of assets. Once someone else gains access to your mnemonic phrases, they can import them into another device and steal your tokens. Therefore, it's crucial to securely generate and back up mnemonic phrases.
Countermeasures:
Use Offline Hardware Wallets: Generate and store private keys with offline hardware wallets to enhance security. Avoid storing them on internet-connected mobile devices to prevent hacking and theft.
Download Wallet Software and Apps Only from Official Channels: Avoid downloading unverified software to minimize security risks and prevent malware from stealing your digital assets or other sensitive information.
Avoid Copying and Pasting Mnemonic Phrases or Private Keys: Manually enter them to enhance security. Additionally, avoid jailbreaking or rooting your device to prevent hackers from exploiting vulnerabilities to steal your digital assets or other sensitive information. Do not visit unknown links to avoid phishing attacks and data breaches; only visit known and trusted links.
Additional Recommendations
Separate Hot and Cold Wallets
Hot wallets (e.g., imToken) are easy to use but require good security awareness. Hardware wallets (e.g., imKey) use secure chips to maximize private key security at the hardware level, making them more beginner-friendly. It is recommended to use imToken software wallets for small assets and imKey hardware wallets for large assets. Combining both ensures a good user experience while maximizing asset security.
Regularly Update Software and Operating Systems
Regularly update or upgrade the software and operating systems on your devices to fix vulnerabilities or bugs and prevent hacker attacks.
Manage Applications on Your Device
Limit applications' auto-start settings, thoroughly delete unnecessary applications, and avoid installing software from unknown sources. Avoid installing applications with remote desktop viewing functions, as malicious actors may use them to spy on your desktop and steal your mnemonic phrases or private keys.
Disable Cloud Storage
Do not use automatic cloud functions to upload sensitive data to online accounts, as this could lead to sensitive information leaks if cloud data is compromised.
Use Strong Passwords
Set strong passwords that include uppercase letters, lowercase letters, numbers, and special characters, and regularly change your passwords.
Final Recommendations
Decentralized wallets offer users greater security and autonomy, but they also come with certain security risks. By understanding these common issues and adopting the corresponding strategies, users can better protect their digital assets.
Lastly, in the "dark forest" of the blockchain world, always remember these two security principles:
Zero Trust: Maintain a high level of skepticism at all times.
Continuous Security Validation: If you choose to trust something, you must have the ability to verify your doubts and make this practice a habit.
Important Notice:imKey sells physical security hardware products only and does not provide any virtual asset trading, custody, or funds-related services. References to third-party wallets, exchanges, or decentralized applications are for compatibility purposes only; related functions and services are provided independently by third parties.
Various cryptocurrencies, like Bitcoin, Ethereum, TRON, etc., operate on separate blockchain networks, each with its unique value transfer logic and information processing methods.
In imToken, the blockchain network is primarily categorized into four types: Layer 1, Layer 2, EVM-compatible chains, and custom networks. If users wish to add accounts from multiple blockchain networks, such as Bitcoin, Ethereum, and TRON, to a single wallet, they can do so by navigating to “My Profile” -> “Wallet Management” -> “Add Account”, and then selecting the desired network to complete the account addition process.
If you cannot find the network you want to check on the add account page, please follow the steps below to configure the network.
Blockchain Network Configuration
imToken currently supports two ways to configure the blockchain network:
1.Quick add
Click "My Profile" - "Blockchain Network" - "+" - "Quick Add" to enter the EVM Box. It contains the mainnets and testnets of all well-known EVM-compatible chains. Enter the network name, such as Ethereum Classic, in the EVM BOX search box, then click "Switch" and "Confirm".
2.Customize
If you still cannot find the network you want to add in the EVM BOX, you can use the customize function. Click "My Profile"-"Blockchain Network" - "+"-"Customize", fill in the network name, RPC address, chain ID, symbol and block browser, and click "Save".
Information about commonly used networks can be queried through Chainlist :https://chainid.network/
After the network configuration is complete, return to the add account page to check the network and add the account.
Note:
When accessing a DApp that requires connection to a specific network such as Polygon, if your imToken wallet does not have an account for that network, you will receive a prompt. imToken will then automatically add the corresponding account, and you simply need to click to confirm the addition on the pop-up page.
Important Notice:imKey sells physical security hardware products only and does not provide any virtual asset trading, custody, or funds-related services. References to third-party wallets, exchanges, or decentralized applications are for compatibility purposes only; related functions and services are provided independently by third parties.
A decentralized wallet is a tool that allows users to fully control their private keys and digital assets. Ownership and management of the assets belong entirely to the user, without reliance on any centralized authority. Based on blockchain technology and decentralized architecture, it enables users to independently generate, manage, and trade digital assets.
The Core Concept of Decentralization
In a distributed system, every node operates autonomously, freely connecting with other nodes to form new network units. Such a system lacks mandatory central control, and no single entity governs data or information.
Blockchain technology supports this decentralization by allowing every participant in the network to access the complete database and its history, directly verifying transaction records without intermediaries. This ensures data transparency while enhancing autonomy and security in transactions.
Key Features of Decentralized Wallets
User Control of Private Keys Decentralized wallets generate private keys and mnemonic phrases upon creation. These serve as the sole credentials for accessing and managing assets. Private keys and mnemonic phrases are stored on the user's device or hardware rather than on centralized servers, giving users full control over the security of their assets.
Non-Custodial Unlike centralized wallets (e.g., exchange wallets), decentralized wallets do not hold users' assets or store private keys or mnemonic phrases. This eliminates the risk of asset loss due to attacks or misuse of centralized servers.
Peer-to-Peer Transactions Users can directly conduct peer-to-peer transactions without relying on centralized platforms. Transactions are broadcast through the blockchain network, ensuring transparency and immutability.
Trustless Blockchain's trust mechanism eliminates the need for intermediaries. Users can verify transaction records through the blockchain, fundamentally avoiding asset loss caused by intermediary issues.
Multi-Chain Compatibility Decentralized wallets typically support multiple blockchain networks (e.g., BTC, ETH, TRX), allowing users to manage various digital assets in a single wallet.
Advantages of Decentralized Wallets
Enhanced Security Assets and private keys are not stored on third-party servers, significantly reducing the risk of attacks or breaches.
Full Autonomy Users have complete control over their assets, avoiding issues like platform bankruptcy or account freezing that could lead to asset loss.
Privacy Protection Users can utilize wallets without providing personal identity information, effectively safeguarding their privacy.
Tips for Using Decentralized Wallets
Backup Mnemonic Phrases Mnemonic phrases are the only way to recover your assets. Losing or exposing them could result in asset loss or theft.
Secure Private Key Storage Avoid storing private keys or mnemonic phrases on internet-connected devices. Use hardware wallets or other encryption tools for safe storage.
Beware of Phishing Attacks Do not click on unknown links or input mnemonic phrases into unofficial applications to prevent asset theft.
Choose Reliable Wallets Use wallet software or hardware that has undergone security audits to ensure safety and stability.
Recommended Decentralized Wallets
imKey Hardware Wallet Focused on cold wallet security, it stores mnemonic phrases and private keys offline, giving users full control over their assets. Ideal for long-term storage of large digital assets.
imToken Software Wallet Lightweight and user-friendly, it supports multi-chain switching, suitable for users with frequent interactions.
Through decentralized wallets, users can not only protect their assets effectively but also enjoy the decentralized, transparent, and efficient trading experience brought by blockchain. Whether you are a beginner or an experienced user, proper management of private keys and mnemonic phrases is essential to fully safeguard your digital assets.
Important Notice:imKey sells physical security hardware products only and does not provide any virtual asset trading, custody, or funds-related services. References to third-party wallets, exchanges, or decentralized applications are for compatibility purposes only; related functions and services are provided independently by third parties.